Even after 20 years of professional IT work, I still see Windows Server misconfigured very, very often. Microsoft made huge steps forward since Windows Server 2000, and Windows Server is now mature and stable product. However, it still needs to be configured correctly, to be able to withstand modern security threats. In this guide, we are going to look into some basic methods for making Windows Server more secure.
Windows Server can be found on cheap VPS services, in Azure, and in local network serving various purposes. In this guide we are going to go over basic methods for making it more secure in public and private networks.
HUGE DISCLAIMER: This guide is not going to make you Windows Server 100% impenetrable, there is no such thing as absolute security. Also be aware that this is a guide, use everything from it that you find helpful. Maybe you won’t be able to implement everything, because service or app won’t work with restrictions applied. Also, I cannot be responsible for any kind of damage you do following this guide.
This guide is done on Windows Server 2025 Standard as a non-domain server, to better simulate environments where it acts as a single product (like VPS).
This guide also assumes you are familiar with Windows Server, so it won’t mention every single step to find a setting or preference.
This guide will cover Desktop Installation, if you use Core Windows Server installation, some of these settings may be already mitigated by design (mostly things that require GUI)
If you are in AD or Azure environment, best way is to have policies defined for your server with central management (for example, group policy).
Security Baseline from Microsoft is very important tool and only way to go if you are serious about security. Use Security Baseline as a tool to standardize your security. At the time of writing this, there is still no official one for Windows Server 2025 – https://techcommunity.microsoft.com/discussions/windowsserverinsiders/announcing-windows-server-2025-security-baseline-preview/4257686
Last tip: First run in test environment, check if everything works right, then apply to production.
After first boot
UPDATING:
There are many things we need to do, but the first step is going to be updating Windows Server installation.
If you don’t have a fresh installation from Microsoft with latest updates, this is absolute first step. Make everything up to date on your Windows installation.
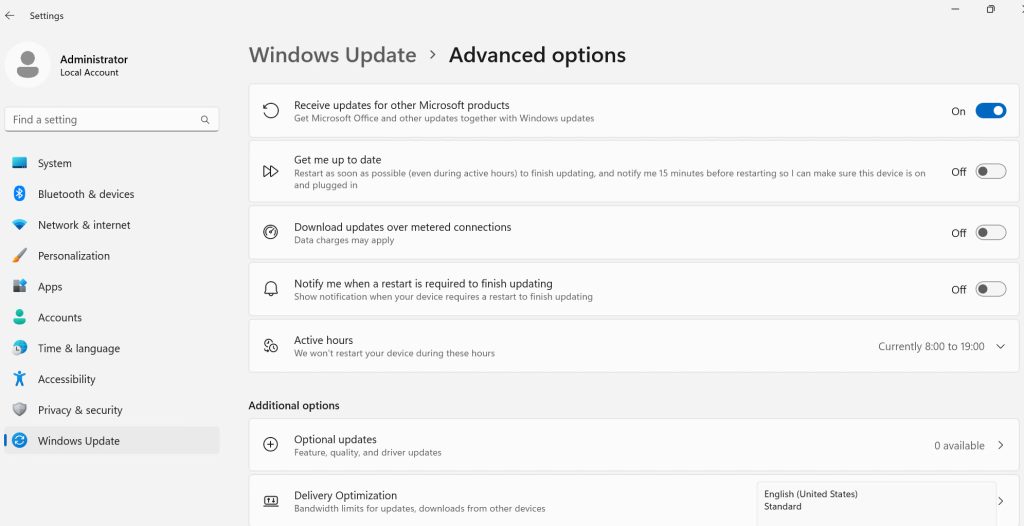
Settings – Windows Update – Advanced Options – turn on “Receive updates for other Microsoft products”
While in Advanced Options, set Active hours in case it is needed, so your Server doesn’t restart in the middle of office hours.
Settings – Windows Update – Advanced Options – Additional options section – Optional updates – while you are updating, also check this place, well, for optional updates.
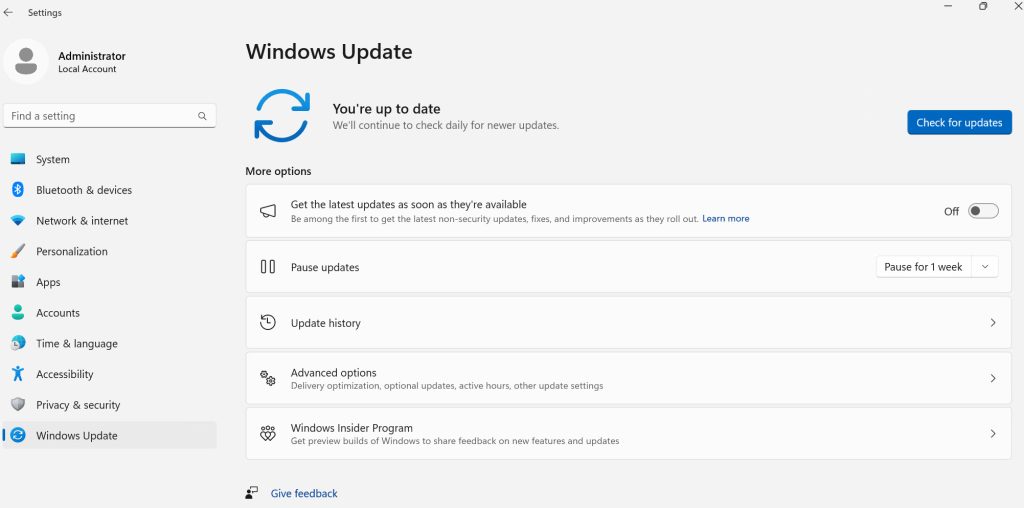
Settings – Windows Update – Check for updates – end result after you check and install updates should be – You’re up to date.
Updating tips and tricks:
- If you are installing Windows Server on physical machine/server, be sure that the physical machine is up to date with firmware, and that you have up to date drivers for Windows Server – all the drivers. Chances are some drivers will be delivered through Optional updates
- Have test environment ready for patching before you patch production – test new patches first in test environment
- Microsoft releases updates every second Tuesday in a month (Patch Tuesday). Make sure you follow what is patched and act accordingly – Zero day and RCE patches are some of the terms you need to be aware
- Example of sources on which you can track what is patched, and what is critical in terms of security – https://www.zerodayinitiative.com/blog/ , https://www.cisa.gov/ , https://msrc.microsoft.com/update-guide
- If your workloads are mission critical and don’t allow downtime, think about Hotpatch for Windows Server 2025, it is available through Azure Arc – https://techcommunity.microsoft.com/blog/windowsservernewsandbestpractices/now-in-preview-hotpatch-for-windows-server-2025/4248296
- If you have Microsoft SQL or some other MS software – CUs need to be installed separately, these won’t be deployed through Windows Update!
- Use WSUS or some other centralized solution for updating If you have a lot of machines
UPDATING OS VERSIONS
Make sure that you keep your Windows Servers always on newest version or -1. Unsupported versions are unsecure versions. Have a plan for upgrading and keep pace with new versions. Keep watch on Server lifecycle (Mainstream End Date, Extended End Date) for Windows Server
USER/SERVICE ACCOUNT MANAGEMENT:
Next stop should be user accounts. If you are using domain environment, logic should be the same.
Right click on Start and select Computer Management
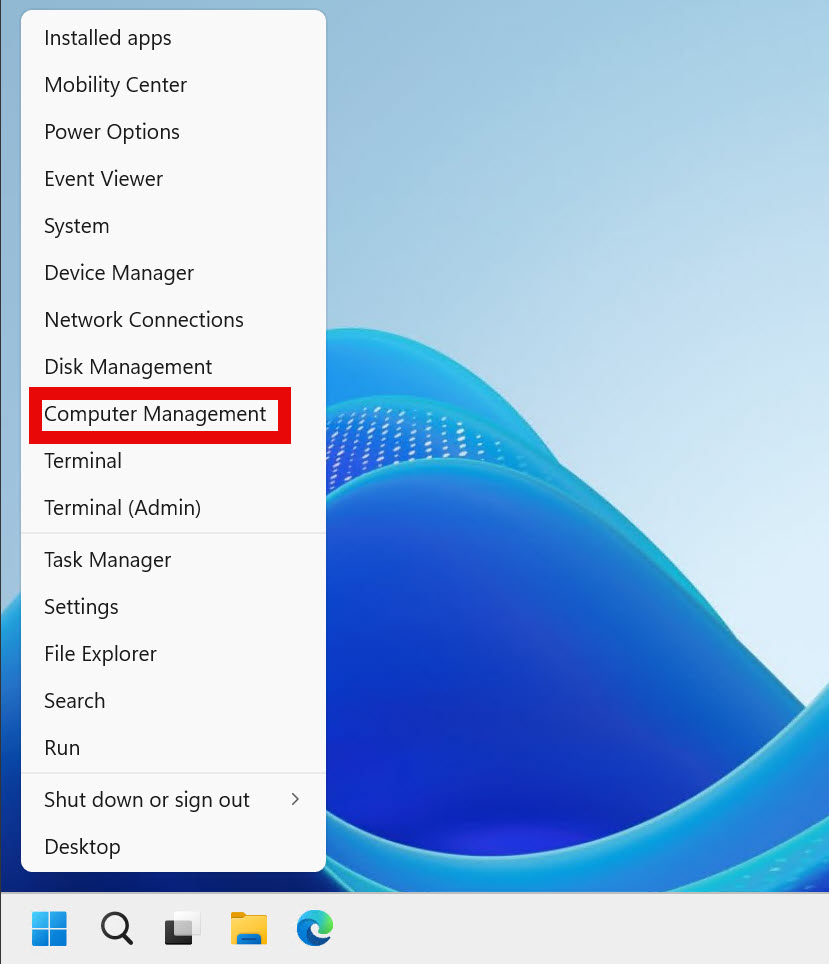
If you prefer longer way to reach Computer Management, you can do it the following way:
Control Panel – first time you open it, click on View by in top right corner – select Large icons – next find Windows Tools and click on it – select Computer Management
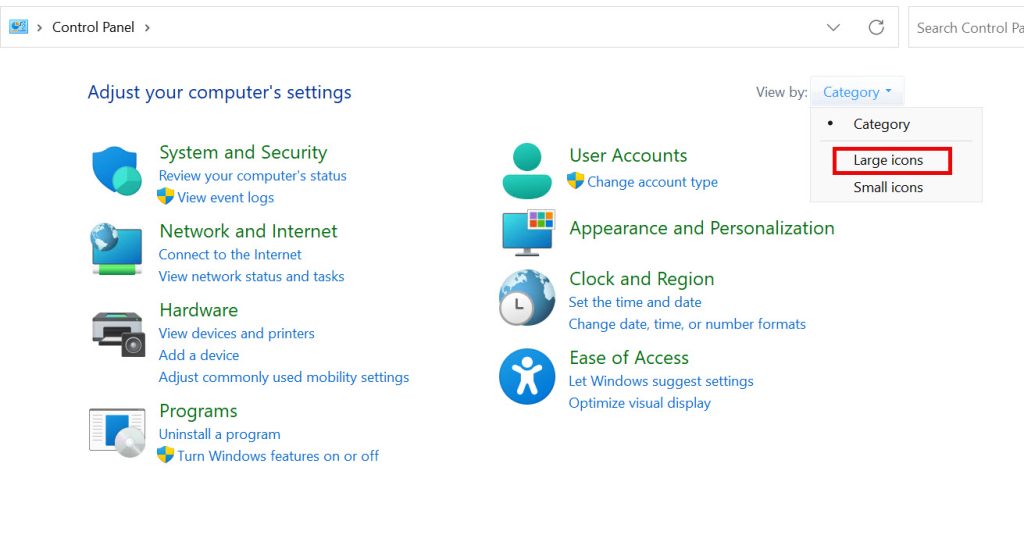
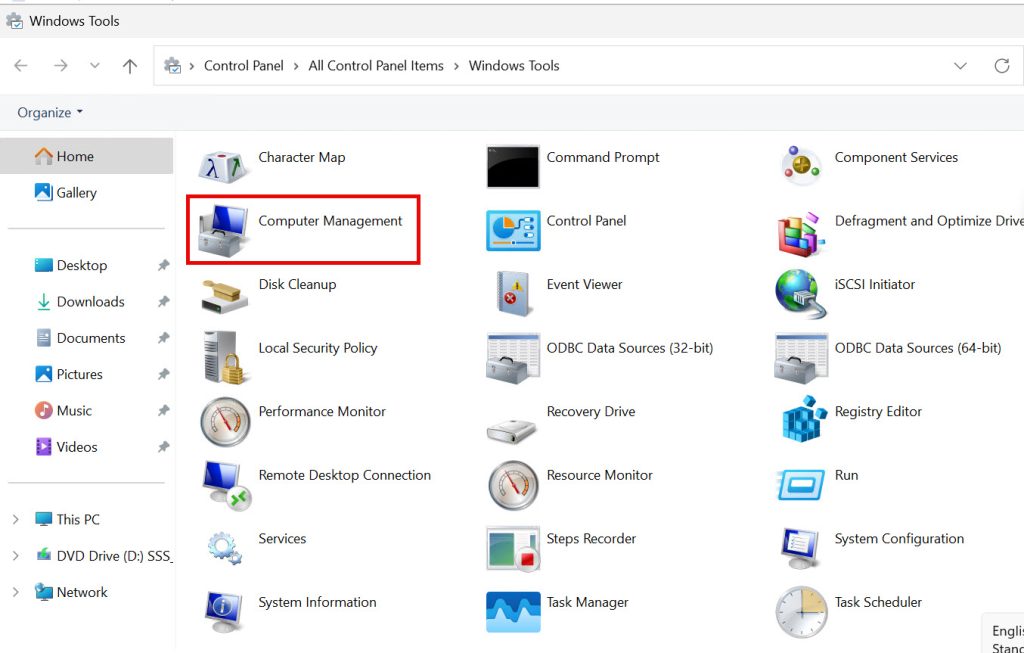
In Computer Management expand System Tools – Local Users and Groups – Users
By default, you will be logged in as Administrator
This is problematic, especially if your machine is publicly oriented, and a lot of VPS machines are directly public facing. Every bot will knock on Administrator account doors and try to bring them down.
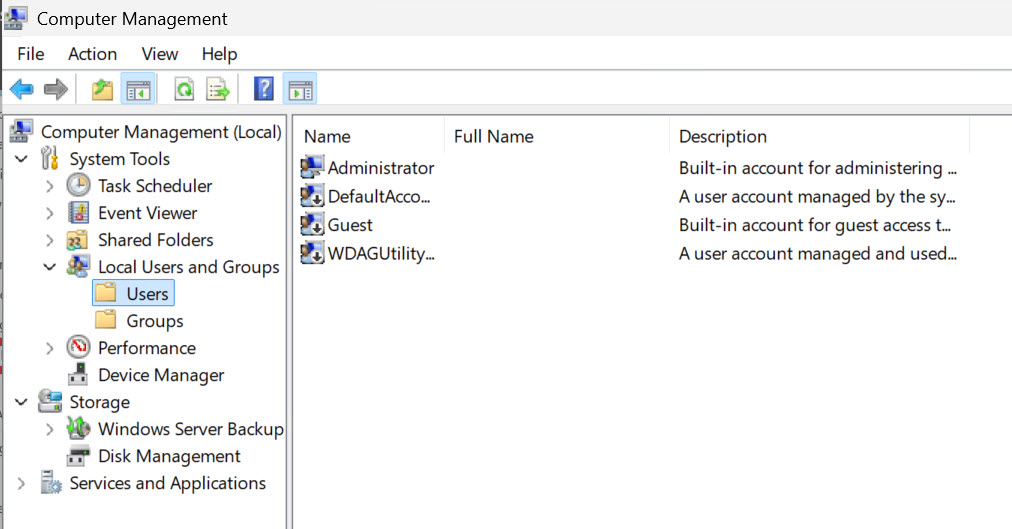
Right click on Users, or somewhere beneath users list and select New User
Give a user some other name that is not easily recognizable. Use passwords with a minimum of 16 characters – letters (capital, small), numbers and special signs should be part of it.
When you are done, click on Create.
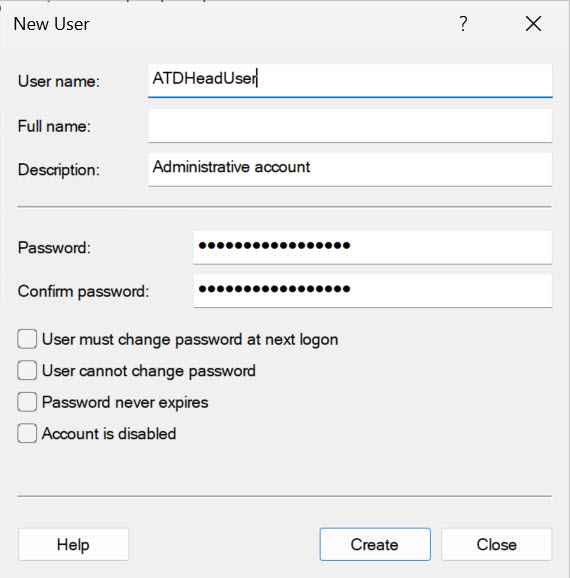
Right click on newly created account (ATDHeadUser) in my case, and select Properties.
On “Member Of” tab, add Administrators – Apply – OK
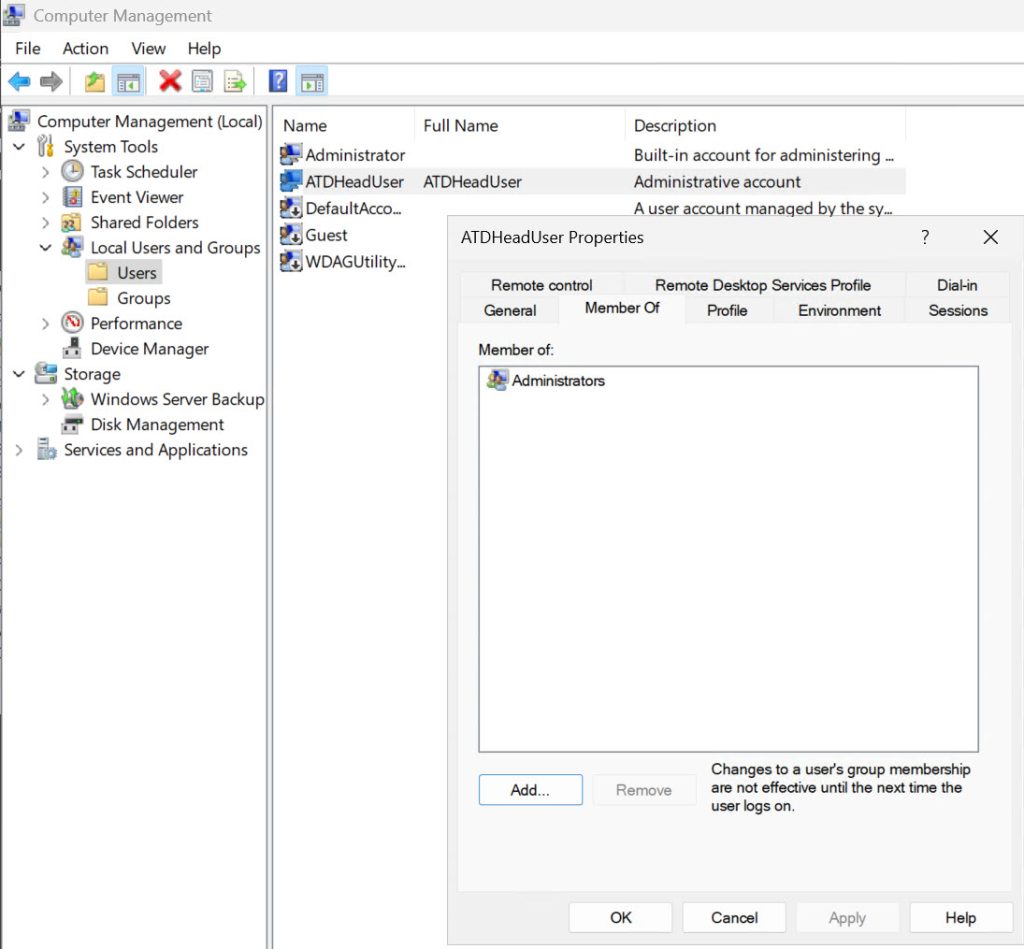
Sign out Administrator user, and log in with new user – ATDHeadUser
After you are logged in with your new user account, go back to Computer manager – Local Users and Groups – Users and check again that your new user account is member of Administrators group.
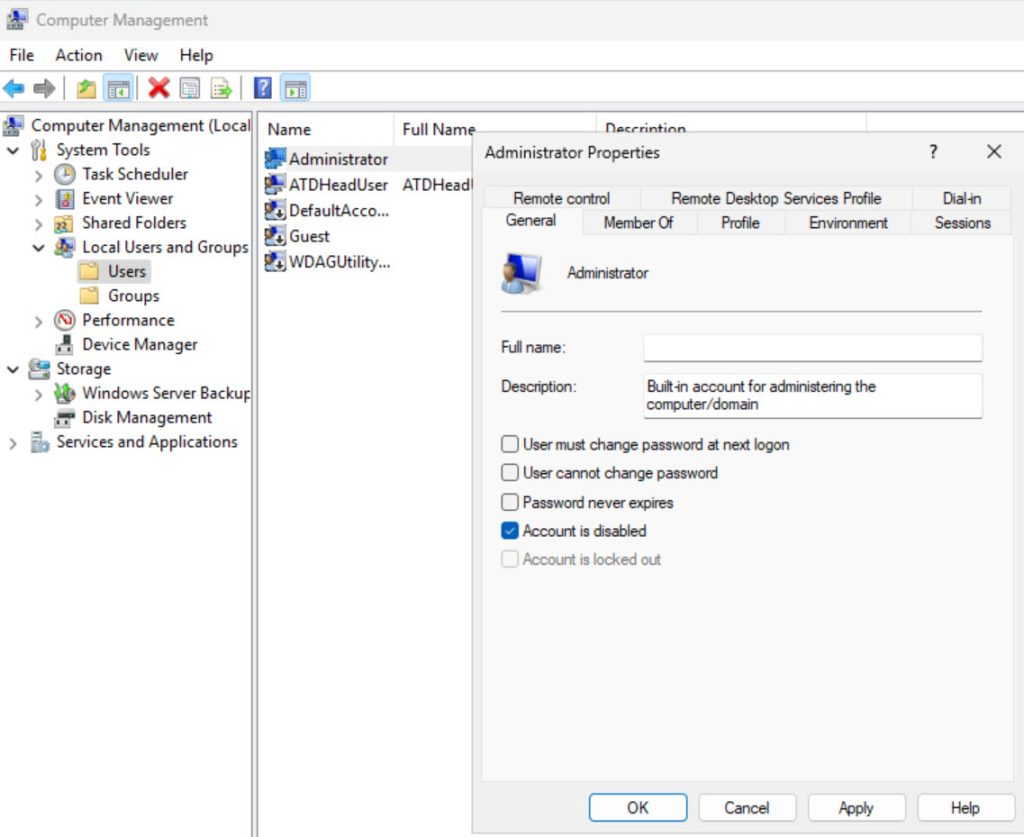
When you are sure, right click on Administrator account, first click on Set password… and set 50–70-character password for the Administrator account.
Then, again right click on Administrator account and in General tab, select “Account is disabled”
Confirm with Apply – OK.
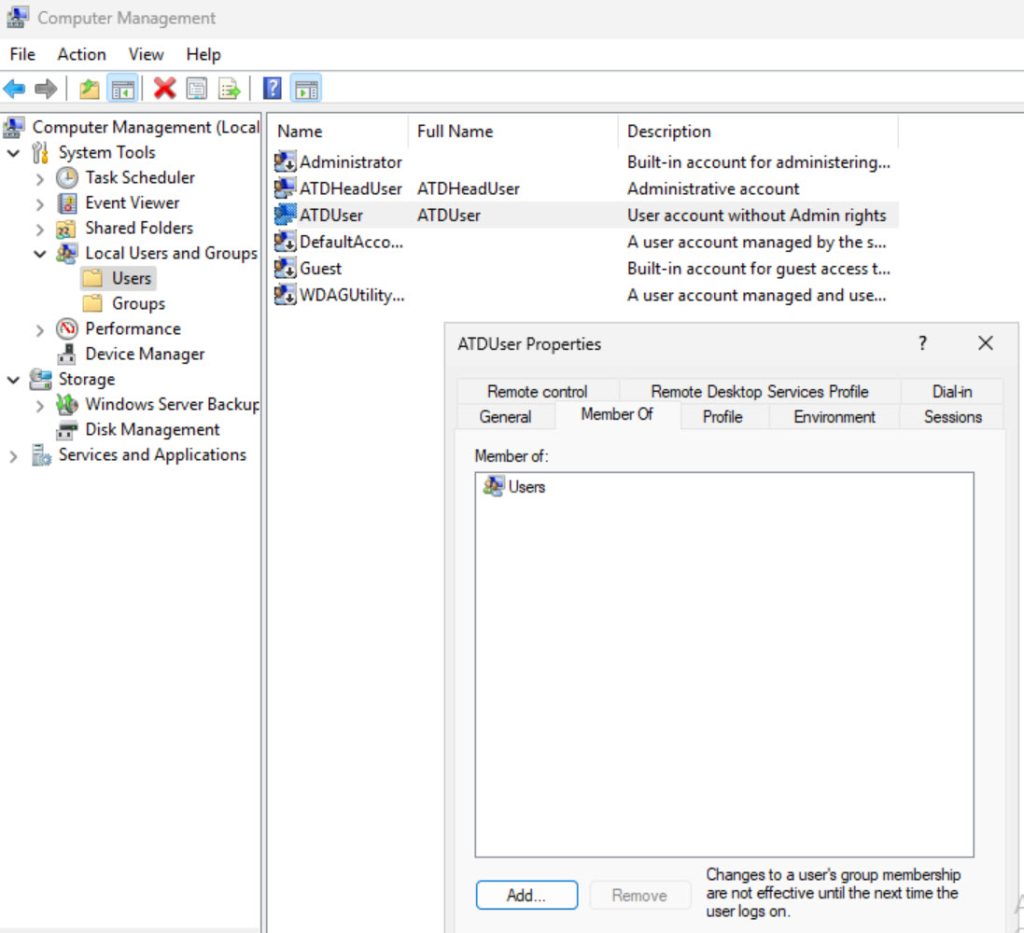
Before we finish, two more tips. Create one more account – I created ATDUser account and leave it only as a member of Users group – so no administrative rights on system.
Use normal user account for everyday administration, checking system status… If you need administrative rights – elevate your privileges to do the task you need.
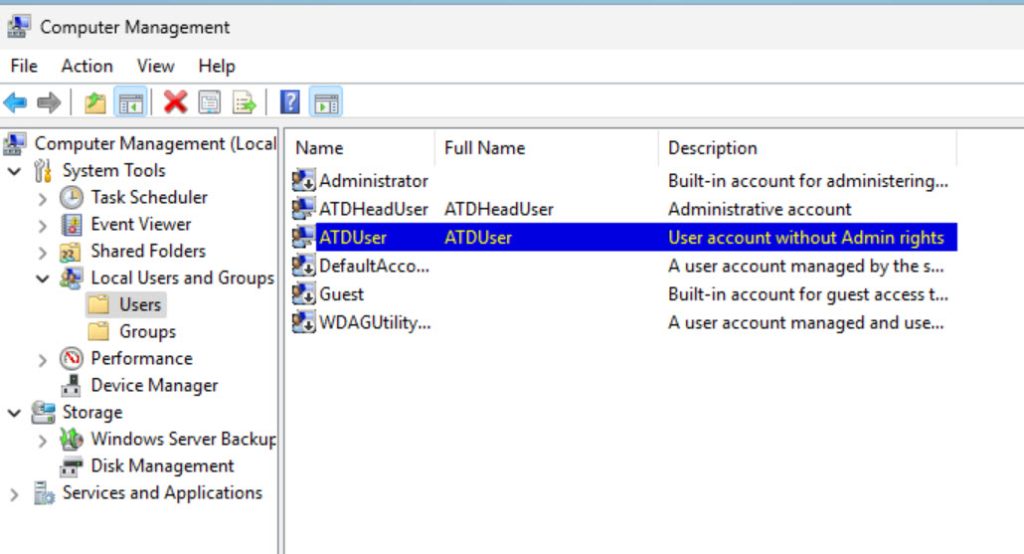
So, this is how my Users look right now. Accounts created by Windows Server should be disabled, and ideally, you should create two accounts, one administrative, and other simple user. Use simple user for light tasks of checking system status, services status, logs, and elevate when necessary to admin account.
Accounts and Groups tips:
- Always start with least privileges, scale up only if needed
- Make sure that you organize users and computer into groups for better organization
- Make sure that every account has a valid description, so that you know what is what
- Use strong passwords always!!!
- Remove accounts that are not used anymore (people that left company, account change…)
- If server is in AD environment, LAPS is great for managing user accounts
- Use accounts and groups to define granular/least privilege access to apps/services
SERVICE ACCOUNTS:
I’m still seeing a lot of cases where applications and services use local user account/domain user account. This is very bad practice. Every service, be it database or app service should have its own account.
Problems with using a user account as service account are multiple – if you change user password – service stops, if you delete user account – service stops. If user account is breached, you app/service is breached…
To mitigate this, simply create a new user account, name it and give it a description so you recognize what it is for (ServiceAccAppX) and give it strong password. Give it minimum user rights (User group)
Create a new user account, but check “Password never expires” – define long, strong password, and from time to time, change it – make that a habit, otherwise this is a very bad practice. Also reboot your system after changing the service account password to check – if it works. There is another/better way of doing this, and I will explain it a bit later.
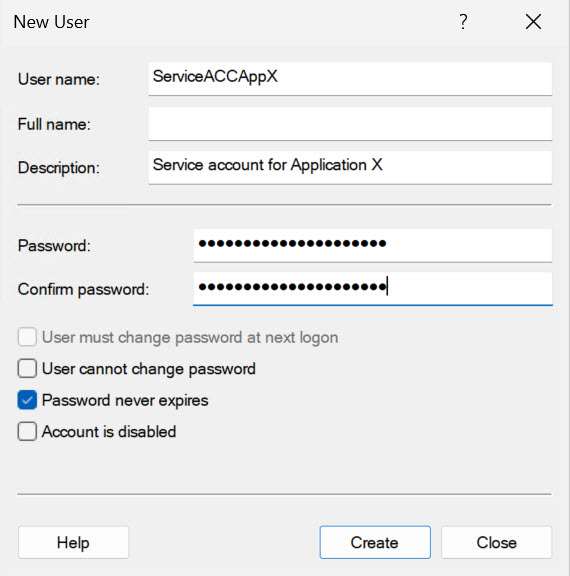
For a start make that account only member of Users group – add user rights if it is necessary for application to work properly. This is very individual thing.
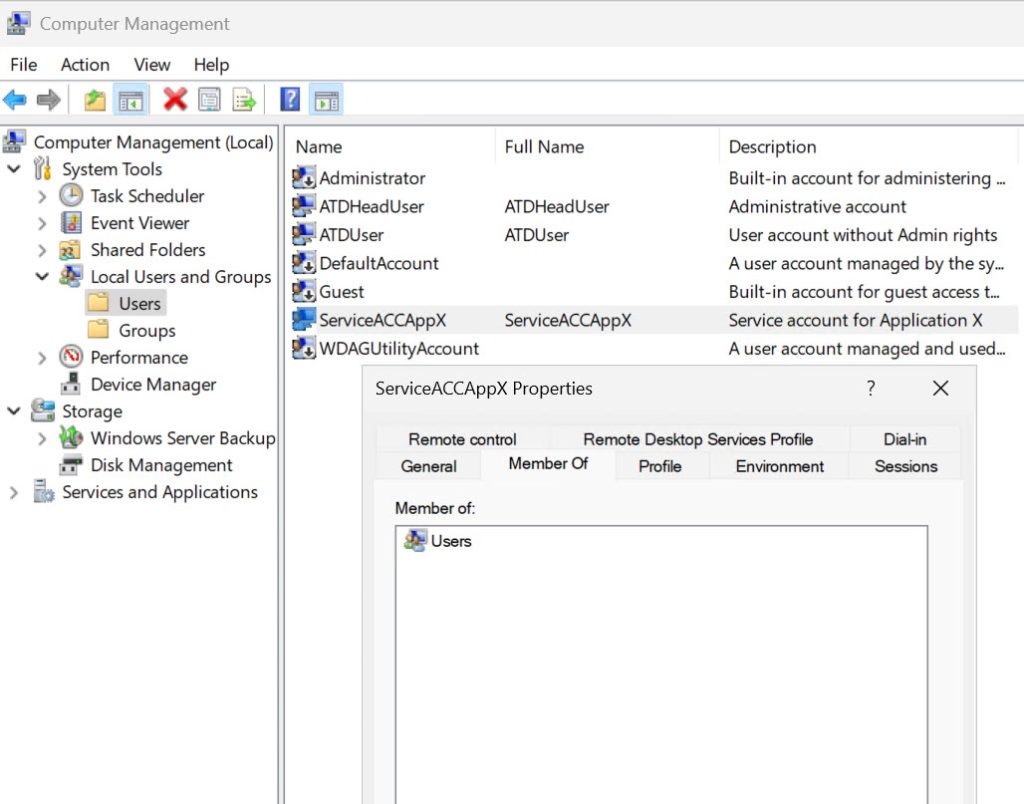
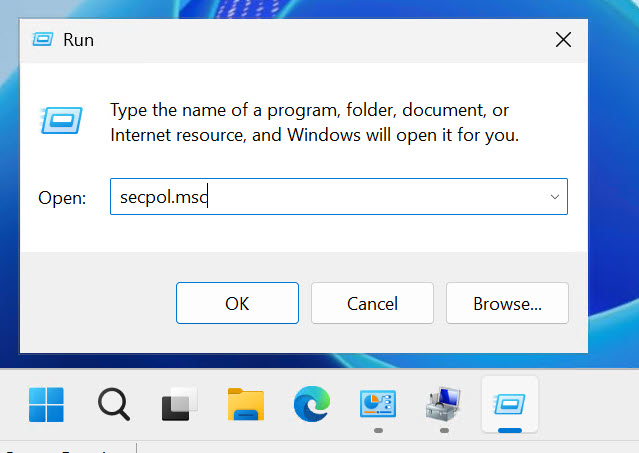
Next stop will be Local Security Policy. Type run in search, and then in run window enter secpol.msc
If you prefer to navigate to command longer way – Control Panel – first time you open it, click on View by in top right corner – select large icons – next find Windows Tools and click on it – select Local Security Policy.
Your service, depending on the application, may or may not work with these settings in Local Security Policy, it is really depending on the app, and what it needs to work.
Under Local Security Policy expand Security Settings – Local Policies – User Rights Assignment – navigate to Log on as a service – add user account that you created to the list. Apply – OK
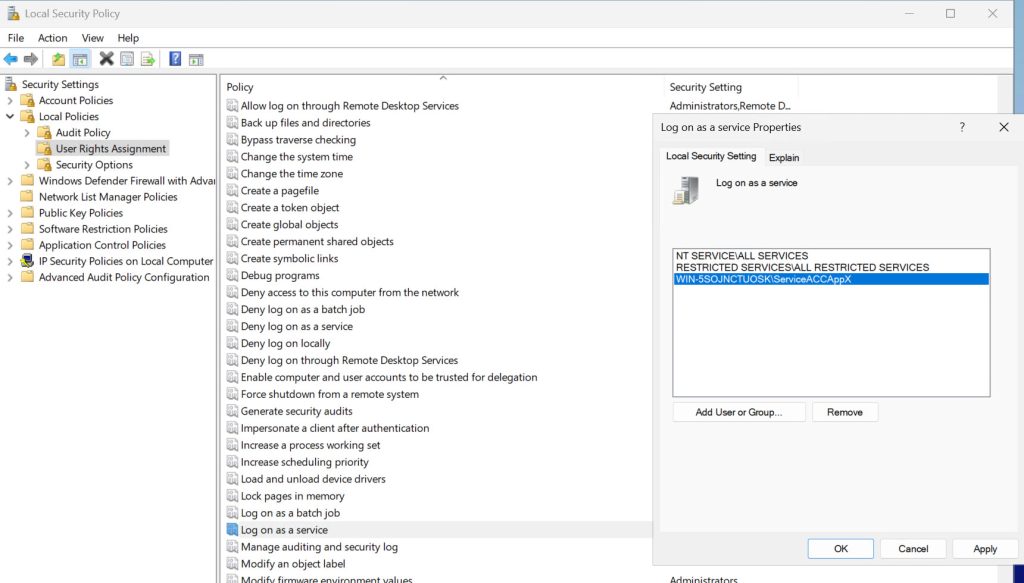
For the next setting we are still staying in User Rights Assignment of the Local Security Policy. Find Deny Log on locally setting and add service account that we created – Apply, OK
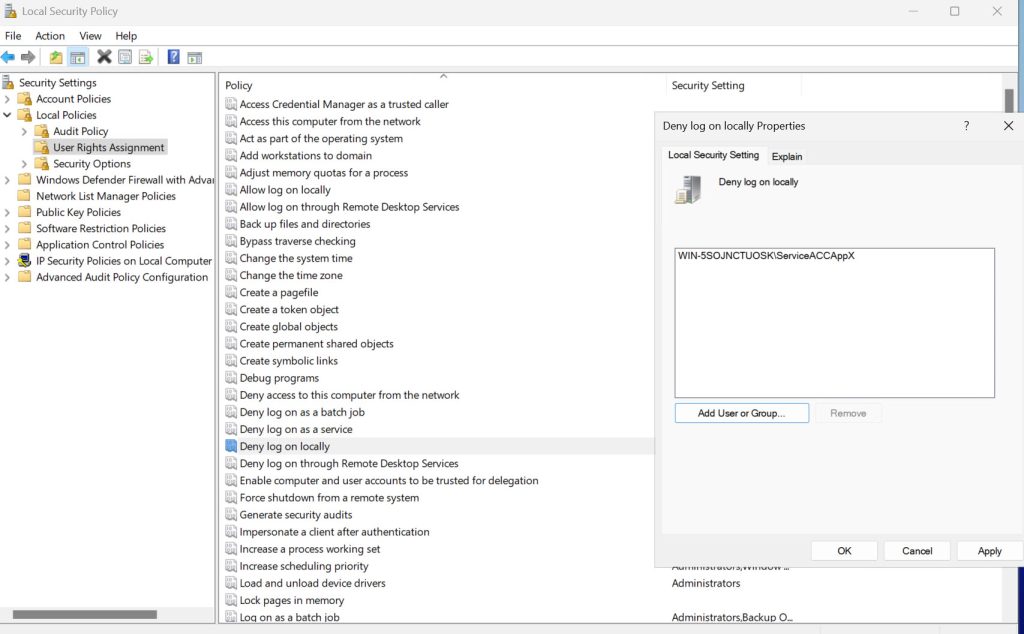
It may be possible that your service account won’t work with one of these settings. If it doesn’t and the service is business critical, make sure to note that and bring to attention in right places.
Service account tips:
- Always start with least privileges, scale up only if needed
- If using local accounts as service accounts, set schedule for regular password change
- Make sure that every account has a valid description, so that you know what is what
- Remove accounts for services that don’t exist anymore
- If you have possibility use Managed Service Accounts (Managed Service Accounts (MSAs) in Windows Server are specialized domain accounts designed to automatically manage credentials for services, simplifying password management and enhancing security for service accounts.)
SET SERVER NAME / TIME AND DATE:
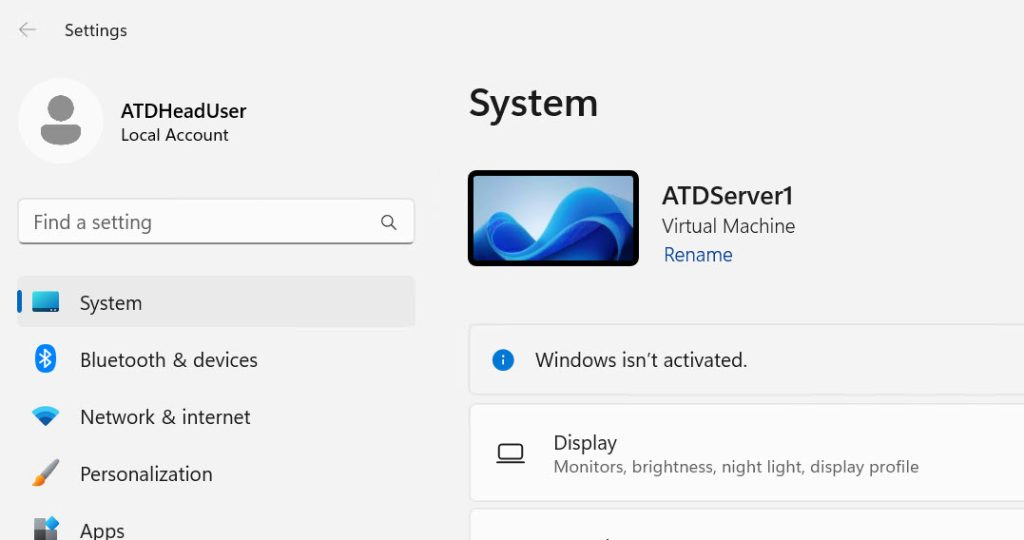
To rename server – go to Settings – System and press Rename in the top middle part of the screen, where the current name of the server stands. After renaming, you will need a reboot of the server.
Why is this important from a security/hardening perspective? When you have a lot of servers for maintenance and surveillance – you won’t know what is what. Make your life easier.
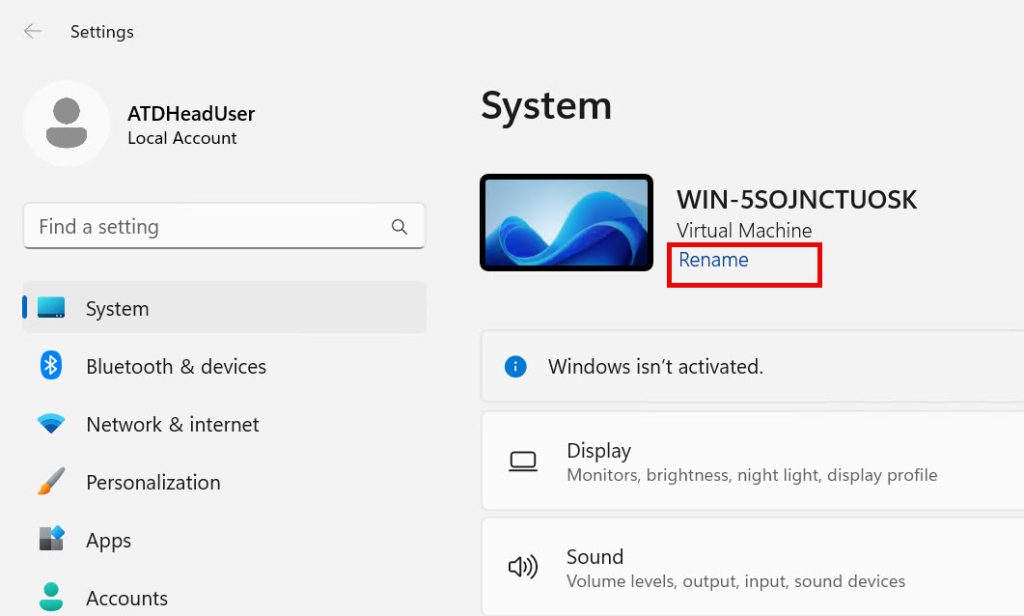
After reboot, all is renamed
Time and date
Type run in search, and then in run window enter timedate.cpl
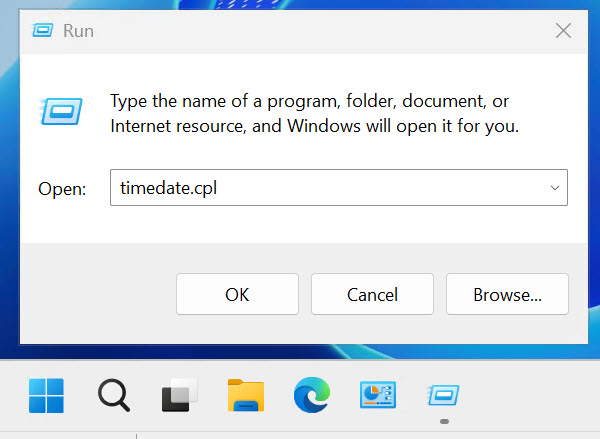
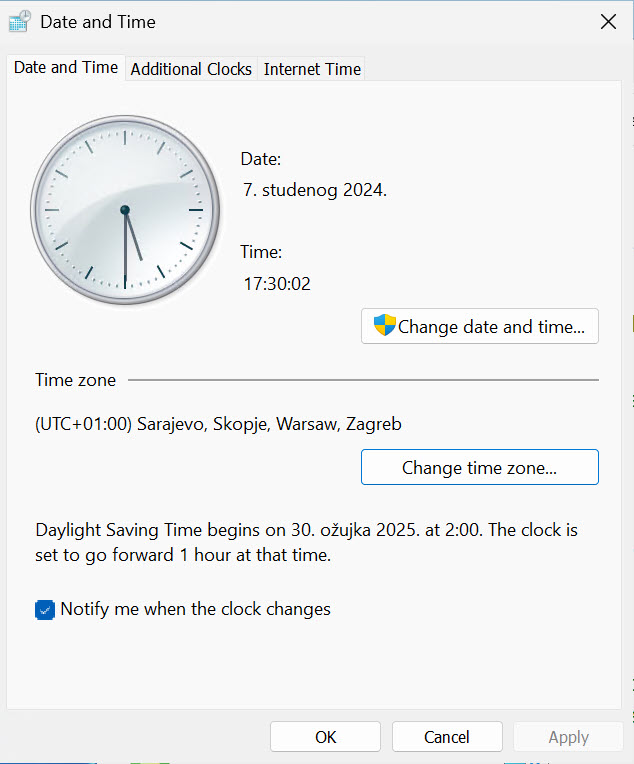
Why is time and date important in security/hardening guide? Without the right time and date, you won’t be able to track logs and events properly. Make sure that you have the correct time zone, date and time and time source.
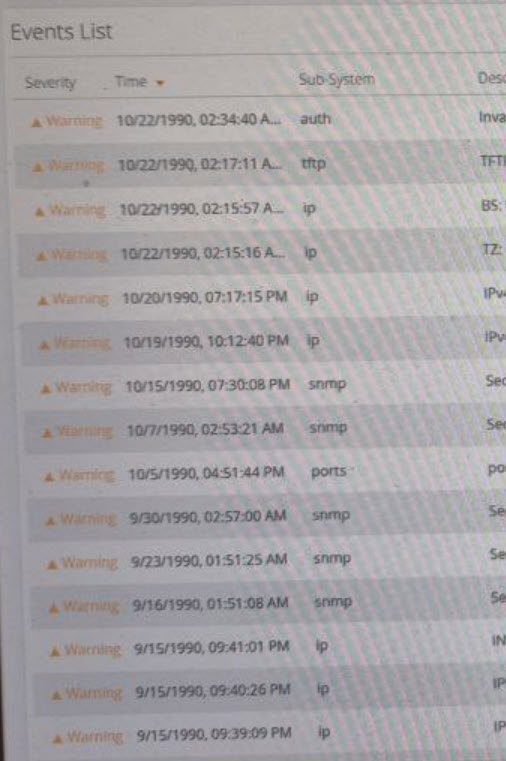
Here is a recent example (not from Windows Server) through I really don’t know when the events occurred (it definitely wasn’t in 1990) because dates and time is mess.
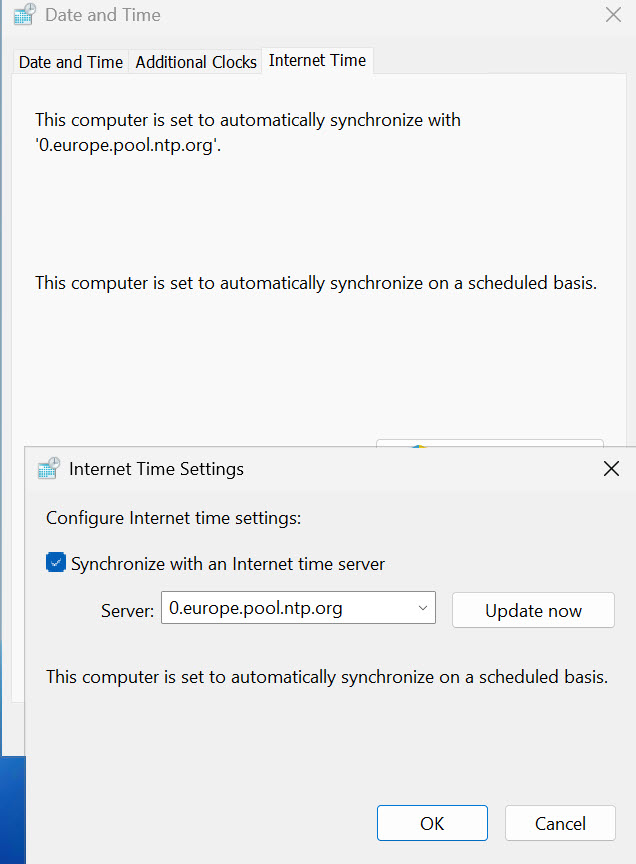
Under the Internet Time tab, you can change where are you getting correct time from. You can use default setting, enter local NTP server from your network, or use ntp.org time servers as depicted below. I’m using those in case the server is isolated on the network, VPS…
https://www.ntppool.org/en/zone/europe
If you wish to add multiple time servers, it can be done via registry, navigate to:
HKEY_LOCAL_MACHINE\SYSTEM\CurrentControlSet\Services\W32Time\Parameters
Double click on NtpServer value, and enter values as follows, values need to be separated with a space:
0.europe.pool.ntp.org 1.europe.pool.ntp.org 2.europe.pool.ntp.org 3.europe.pool.ntp.org
ENCRYPTION:
Encrypting data at rest:
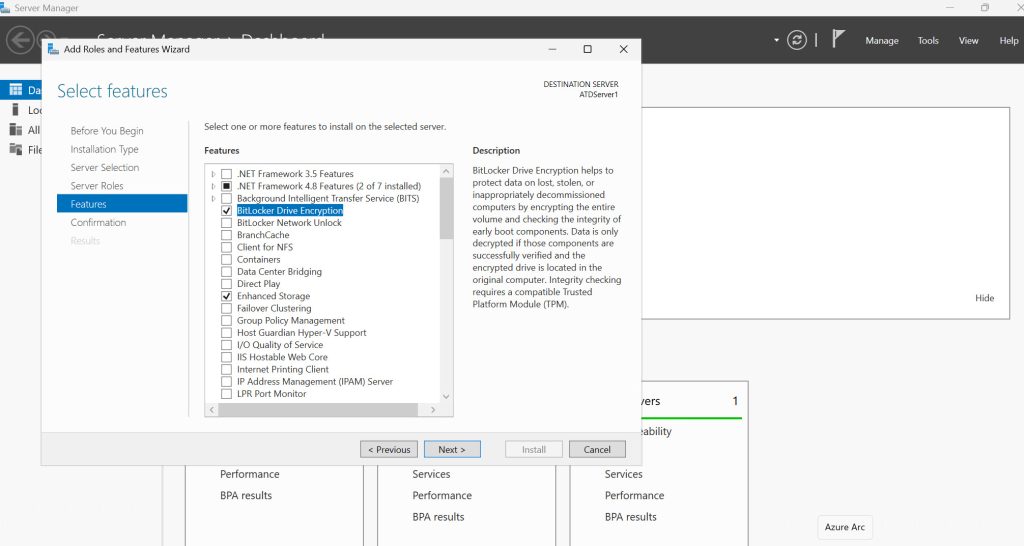
This part is especially important if your server is in collocation, cloud service, VPS… Encrypt entire disk so that your data is secure at rest.
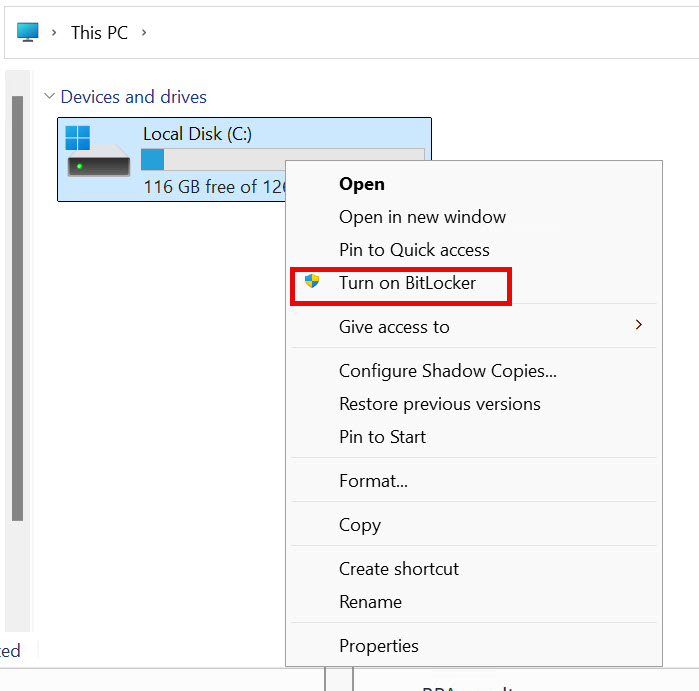
Server Manager – Manage – Add Roles and Features – under Features click on Bitlocker Drive Encryption
Server restart will be required!!
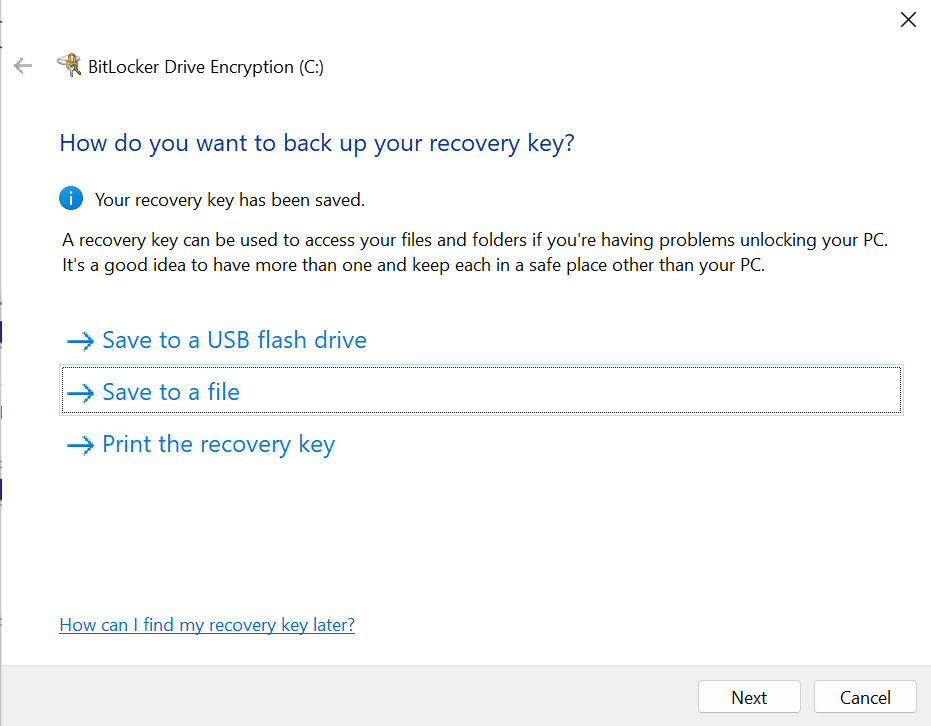
On the step in which you need to backup recovery key – I usually select Save to a file – and I save key to encrypted and safe location. If you are dealing with VPS or some other form of environment where you don’t have external storage – you can install Microsoft PDF print, print key to PDF and securely transfer it to your location.
It is extremely important that these recovery keys are stored, and safely stored. If your server is in AD environment, this can be handled in AD.
Last, and most important – physically print and store your BitLocker recovery keys in safe. CrowdStrike BSOD is good lesson why you should do it – in case all your machines are down, and require recovery key – if you don’t have physical copy (or encrypted copy outside of your system) you won’t be able torecover your system.
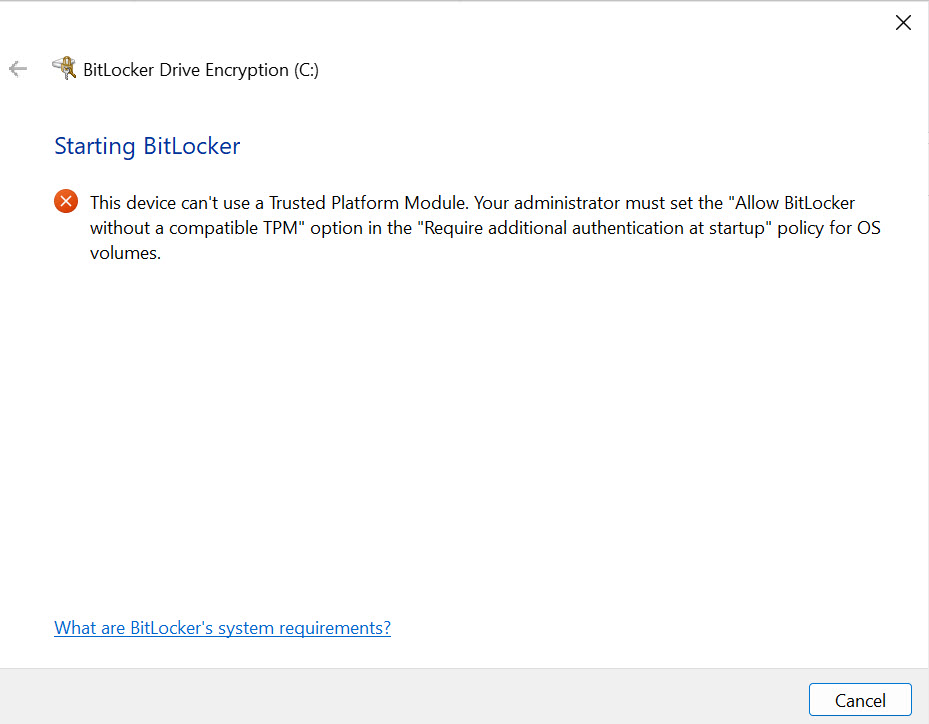
If the server/VPS does not have TPM, you’ll get the following message if you try to use BitLocker.
Now, before you proceed with configuring BitLocker on the machine that has this error be aware that you won’t be able to boot it without entering BitLocker password first!
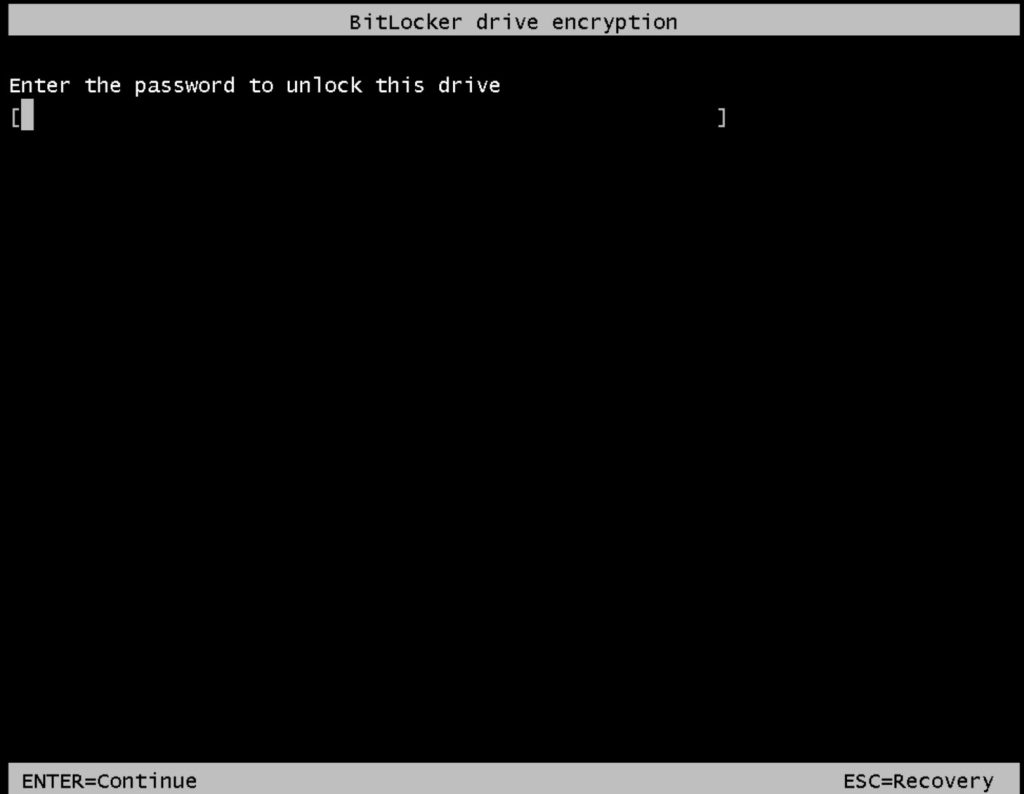
So, if you don’t have access to your server in boot environment (iLO, iDrac, VNC on some VPSes) this is going to be a problem, and you need to think about BitLocker implementation.
However, if you are willing to proceed, enter gpedit.msc in search – navigate to “Computer Configuration > Administrative Templates > Windows Components > BitLocker Drive Encryption > Operating System Drives – Require additional authentication at startup – set to Enabled – also mark Allow BitLocker without a compatible TPM (requires a password or a startup key on a USB flash drive).” Apply – OK, reboot Server and try to enable Bitlocker again.
Encrypting data in transit:
If you are using web apps/services/remote connections, always use secure protocols TLS, HTTPS, SSH… You should also have valid certificates issued by trusted certificate authority.
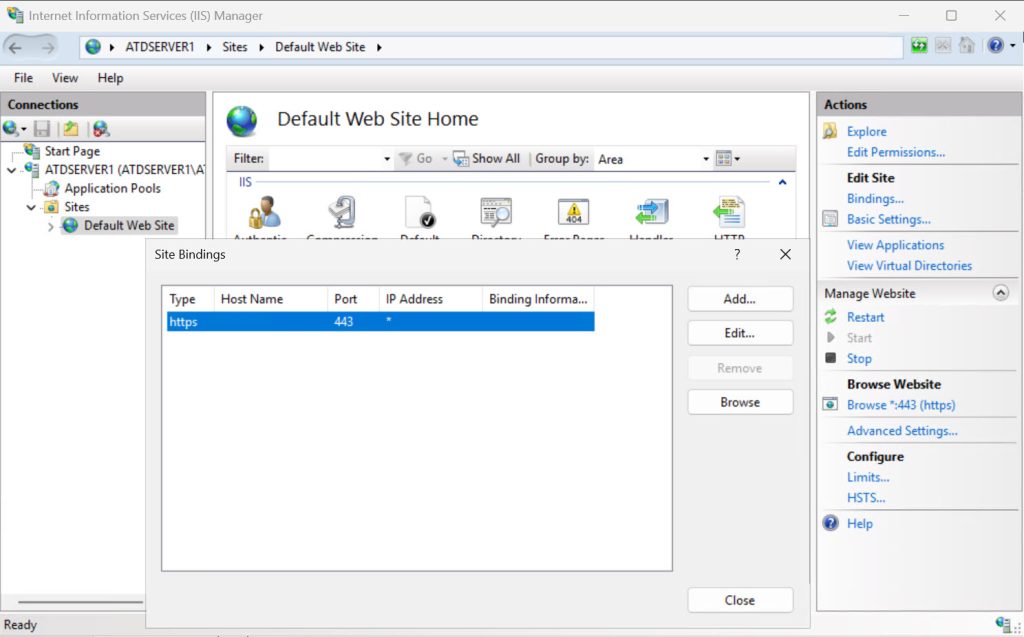
Unsecure protocols don’t have place in today’s IT landscape, and services exposed in unsecured manner won’t last long.
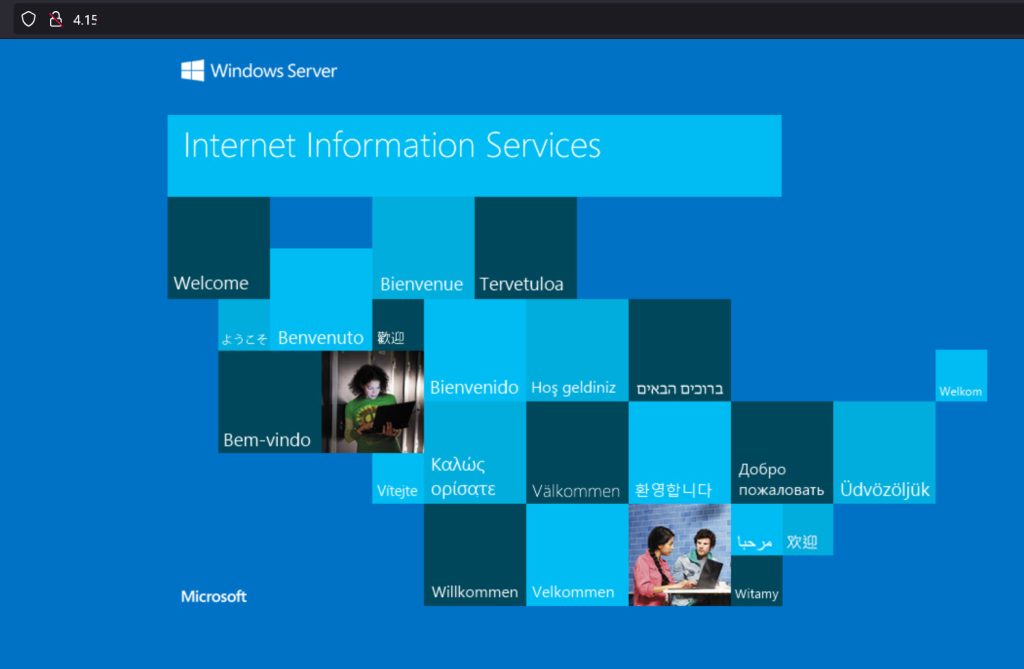
Encryption tips:
- Think about encryption scenarios, when and for what you need encryption (do you have sensitive data)
- If you need high performance of disk drives, evaluate disk encryption first
- Always encrypt everything in cloud environment
- If protection of files/folder is needed think about EFS or third-party encryption tools
- For data in transport, always use TLS, don’t use unencrypted protocols/services
FIREWALL:
It is hard to give precise firewall hardening guide, because firewall configuration depends on services and functionalities you have on server.
One thing is for sure, firewall HAS TO BE ALWAYS ON!!
Don’t bring the firewall down, find what ports you application needs to work.
The principle of least privilege applies – open only ports and let apps that need to communicate through network.
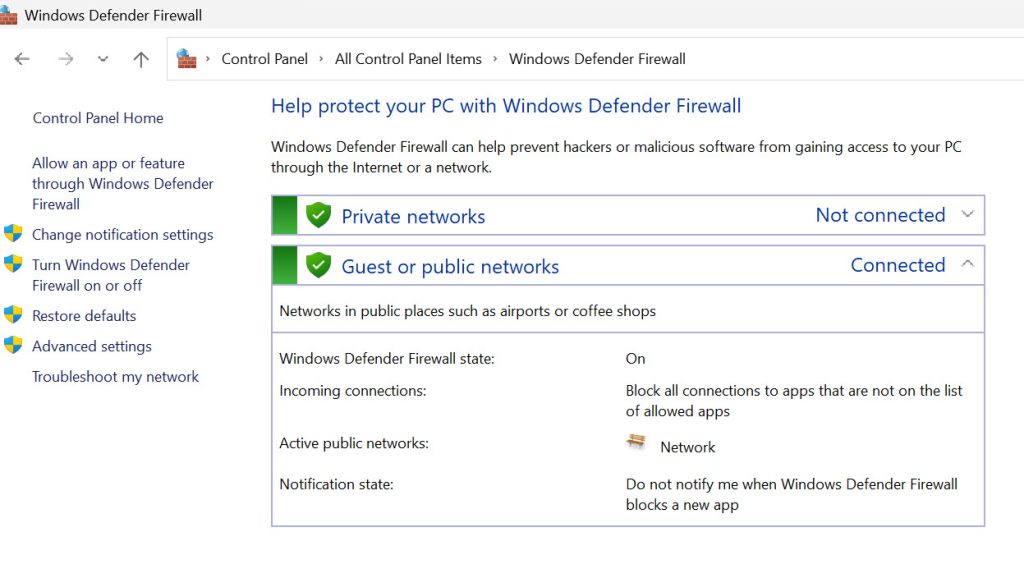
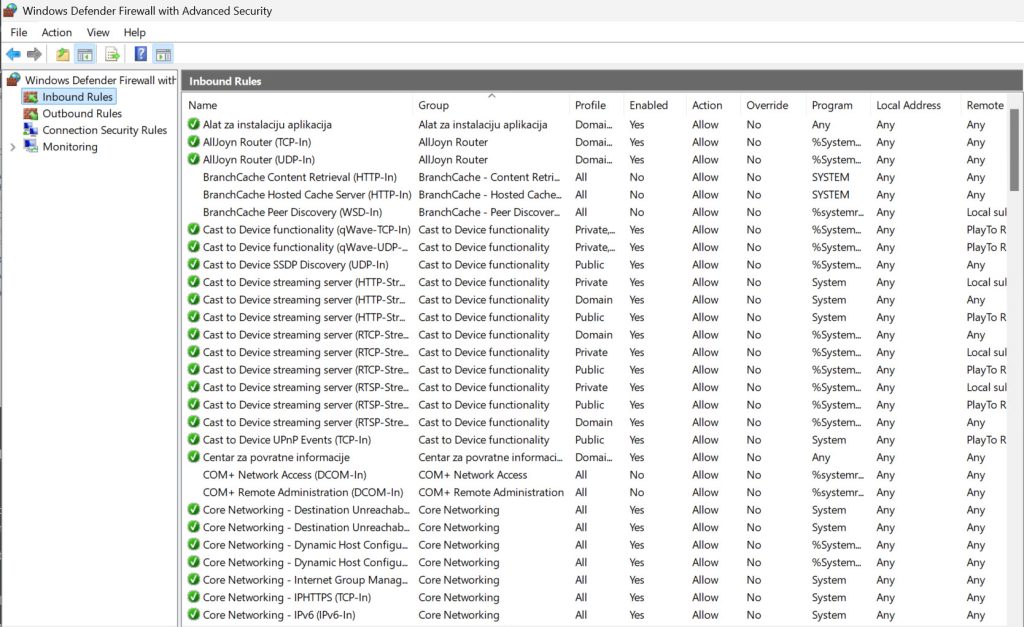
Under – Control Panel – Windows Defender Firewall – click on Advanced Settings – define Inbound and outbound settings separately. Inbound rules are extremely important since open ports under Inbound Rules will allow access to the server from local network or internet.
Leave (or move) your network adapter to “Public network” setting – since it is more restrictive.
Settings – Network & Internet – Ethernet – Network Profile type – Public network

Disable access to WinRM from outside!! Leave it only if it is secured and needed – if you don’t know what that is – disable that rule.
Disable access to PowerShell from outside networks (allow only LAN). PowerShell is often vector for malicious attacks, you can force access to it from only internal/local network, and block all outside access.
Run cmd as admin:
First command will allow access from local network
netsh advfirewall firewall add rule name="PS-Allow-LAN" dir=out remoteip=localsubnet action=allow program="c:\windows\system32\WindowsPowerShell\v1.0\powershell.exe" enable=yesSecond will block access from all other networks
netsh advfirewall firewall add rule name="PS-Deny-All" dir=out action=block program="c:\windows\system32\WindowsPowerShell\v1.0\powershell.exe" enable=yes
Next command will do the same but for all Powershell versions:
for /R %f in (powershell*.exe) do (
netsh advfirewall firewall add rule name=“PS-Allow-LAN (%f)" dir=out remoteip=localsubnet action=allow program=“%f" enable=yes
netsh advfirewall firewall add rule name=“PS-Deny-All (%f)" dir=out action=block program=“%f" enable=yes
)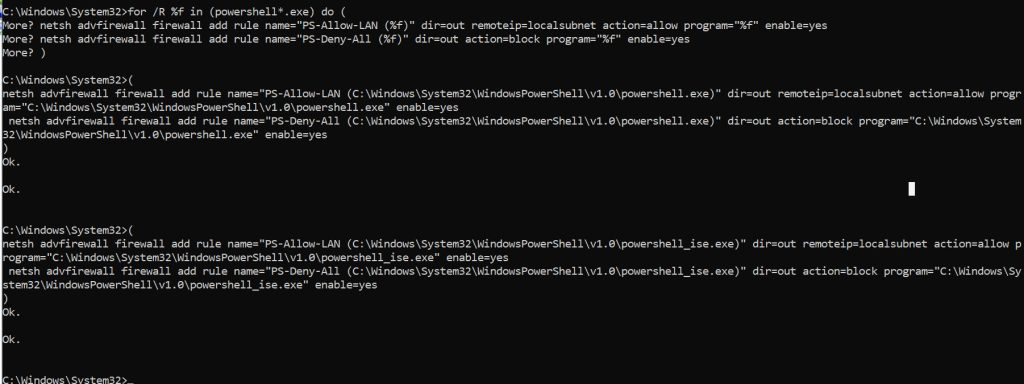
This is what your firewall will look like in the end (Outbound portion of it)

This command is not almighty, and if an attacker changes the name of PowerShell command, will not be blocked by this. But anyway, this is a solid addition to the defense toolset.
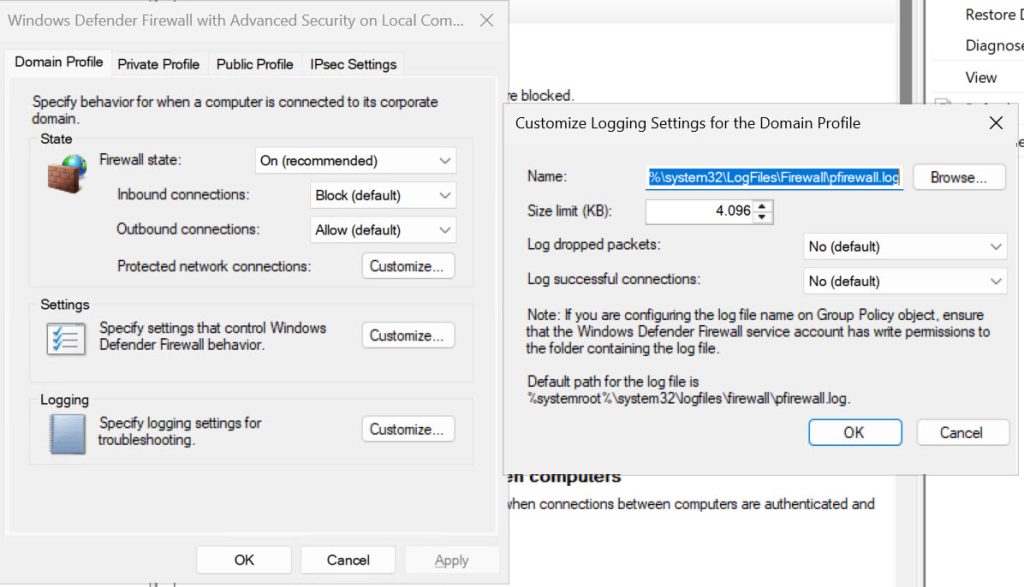
Enable Firewall logging
Under – Control Panel – Windows Defender Firewall – click on Advanced Settings – right click on Windows Defender Firewall with Advanced Security – select Properties.
For every Profile define Logging – size of the log, location, and define if you want to log dropped packets and/or successful connections.
There are a lot of rules opened by default in Inbound rules – depending on purpose of your server installation, some of these rules may need to remain open.
I usually shut down – AllJoyn Router, Cast to Device functionality, mDNS, Start, Wireless Display, WLAN Service.
Windows Remote Management should only be used in safe/local environments – it should never be exposed directly on internet facing servers!! So, disable it if the server is exposed on the internet. It is especially problematic if not used in domain environments, then it falls back to Basic auth, and can also use HTTP port!
Here is the description of default rules that are opened in inbound firewall:
AllJoyn Router: Allows local network communication between IoT devices using the AllJoyn framework.
Cast to Device functionality: Enables media casting from your device to other compatible devices on the network, like TVs or speakers.
Desktop App Web Viewer: Supports embedded web content in desktop applications using WebView2.
DIAL Protocol Server: Facilitates remote access and VPN connections using protocols like PPP (Point-to-Point Protocol).
Feedback Hub: Allows sending feedback and diagnostic information about Windows to Microsoft.
mDNS (Multicast DNS): Enables devices to discover each other on a local network without a central DNS server, often used for device sharing.
Microsoft Media Foundation Network Source: Allows streaming and sharing of multimedia content over the network.
Start: Manages network connections for starting certain services and applications at boot.
Windows Feature Experience Pack: Supports additional Windows features and experiences delivered via Microsoft Update.
Windows Remote Management (WinRM): Allows remote management of Windows devices using protocols like PowerShell remoting.
Wireless Display: Enables screen mirroring from your device to compatible wireless displays using Miracast.
WLAN Service: Manages Wi-Fi connections and allows access to wireless network settings.
Work or school account: Facilitates network connectivity for accessing resources associated with work or school accounts.
Your account: Manages network connections related to personal Microsoft accounts and services.
Firewall tips:
- If possible, create a rule based on binary or executable. That way the rule will be only active when app is active.
- Disable services like WinRM if server is directly exposed to the internet
- Make sure you have proper naming and description for every rule, so that you know what is what.
- If possible, use Group Policy to enforce firewall and firewall rules
- Segment networks and rules (VLANS, DMZ – production servers, development, web…)
- Revise rules from time to time (some may not be needed anymore)
- If you want to identify blocked apps – look for event id 5031
Extra tip for your workstation. Chances are, you don’t need inbound rules, so why not completely block them. But be careful, this will also block rules that are allowed!!!
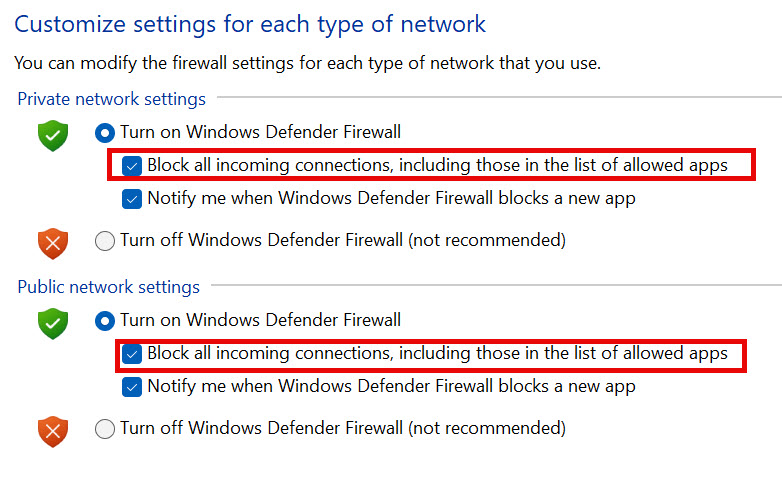
NETWORKING & FILE/FOLDER SHARES:
First, servers should have static IPs in local network. Adapters should also have proper names (LAN1, WAN1…).
For availability, adapters should also be configured as teams (if install on physical machine)
In Control Panel – Network and Sharing Center – Change adapter settings (on the left side of the screen) – right click on your network adapter and select Properties
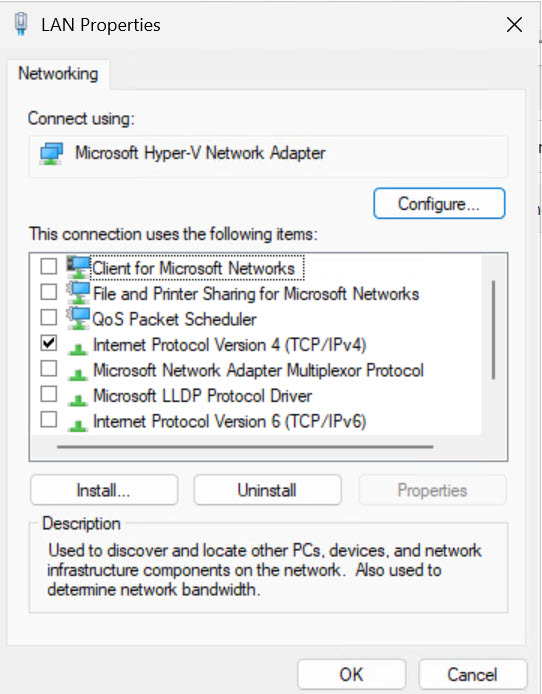
On networking tab – find „Internet Protocol Version 6 (TCP/IPv6)“ and uncheck it. If you by any chance access the internet or local network by IPv6 (which is extremely rare) leave it on.
IPv6 proved to be an elegant way of attacks, since it is neglected and unmonitored, but is everywhere left turned on.
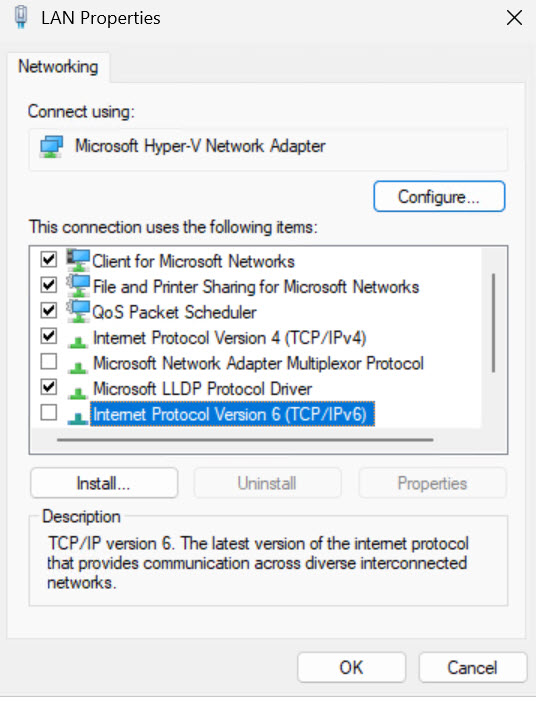
If you have VPS, with single Windows Server machine, that is exposed to Internet and is serving web app/site alone, without additional machines, you can also set Networking card like pictured below
DO FOLLOWING ONLY IF THIS IS SINGLE MACHINE SOMEWHERE IN THE CLOUD DIRECTLY SERVING WEB
Leave only Internet Protocol Version 4 (TCP/IPv4) on, uncheck everything else. This way you minimized network exposure of your server.
Networking tips:
- Segment your network, web servers, or web exposed services should not be in same VLAN with internal production, use DMZ, VLANs.
- Use NPS if we’re talking about internal/organized network, for additional layer of security
- Use secure DNS if possible (DNSSEC).
Network Shares:
SMB 1 should not be option anymore, check if it is active by typing following in Powershell:
Get-SmbServerConfiguration | Select EnableSMB1ProtocolResult should be False.
In the end of 2024, SMB1 should be disabled, if you have services that still need it, check what are your alternatives to mitigate it.

Files shares and security on shared folders should be defined by user or even better, a group, with minimal permissions that are needed to get the job done
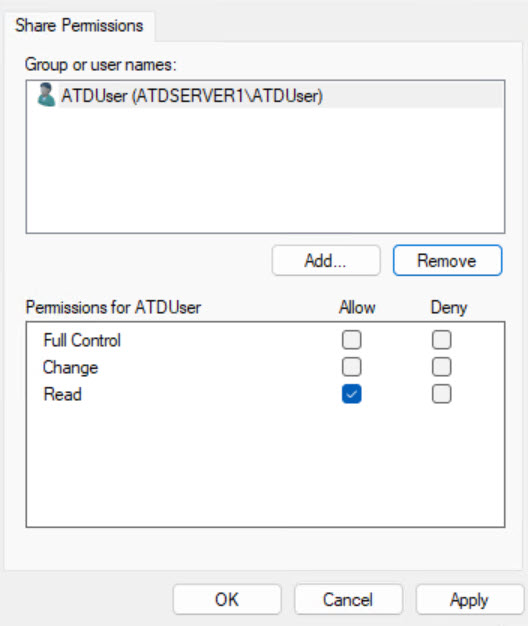
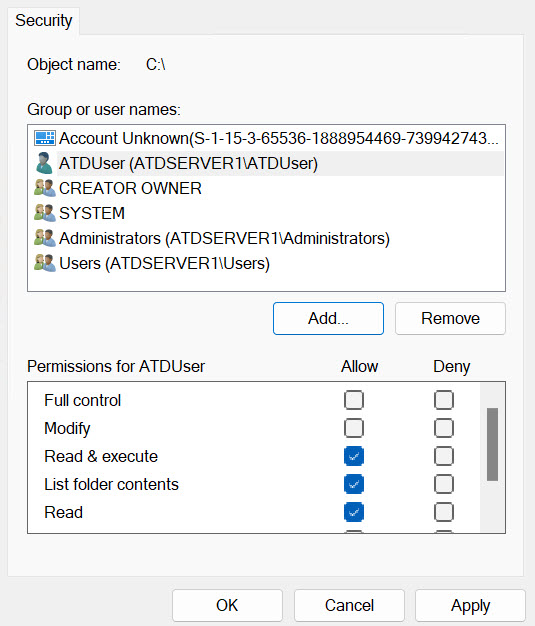
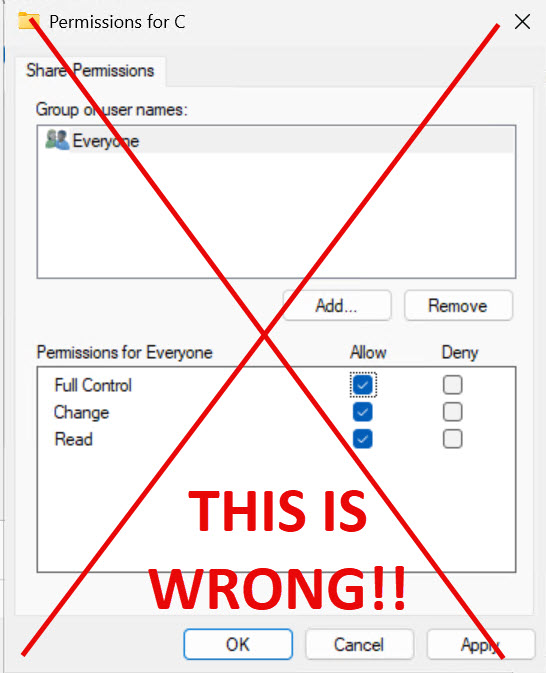
What’s wrong with the pictures above? Sharing entire drive is WRONG and should never be done, yet I’m seeing it sometimes.
EVERYONE SHOULD NEVER BE USED as a solution for file sharing!!!
Getting rid of $ shares
Right click on Start – select Computer Management – Expand Shared Folders – Shares
There are default “admin” ($) shares – some apps and services need these to work. Depending on the workload on your server (especially if it is single, exposed server) you maybe can disable these. Check if these affect your workload, if safe, you can disable them
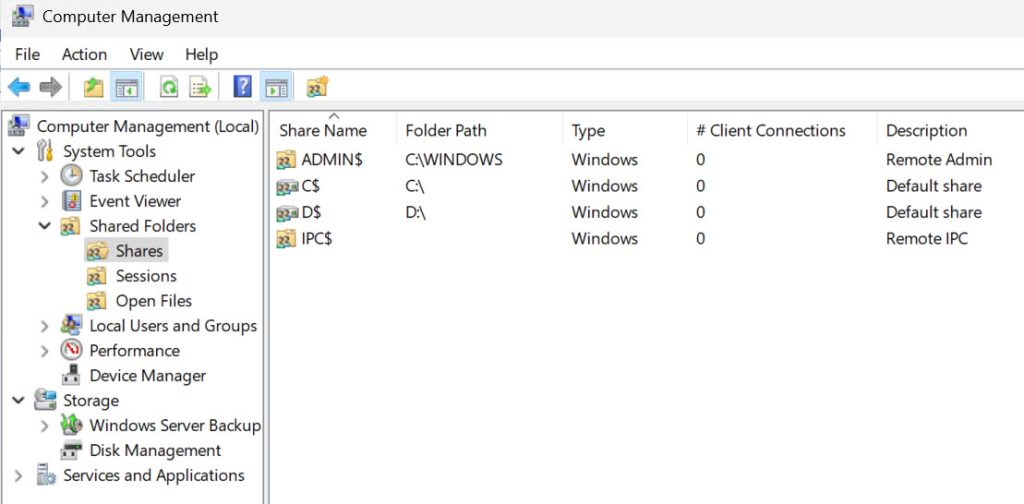
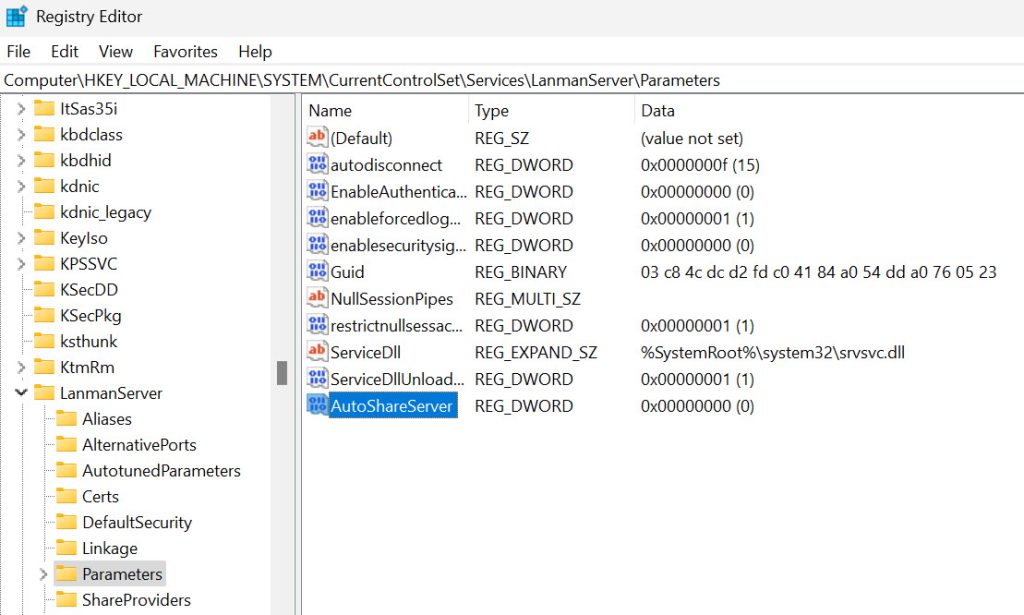
To disable those, run regedit, and navigate to
HKLM\SYSTEM\CurrentControlSet\Services\LanmanServer\Parameters
 Add new value:
Value Name: AutoShareServer
Type: REG_DWORD
Value: 0
For the setting to take effect, and If you don’t wish to reboot server, run cmd as admin and type in following:
net stop server
net start server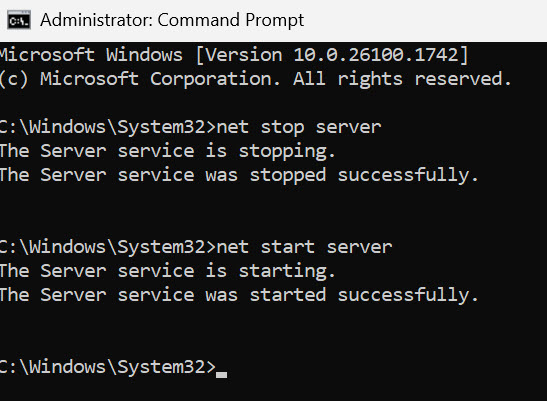
File shares with $ should be now disabled
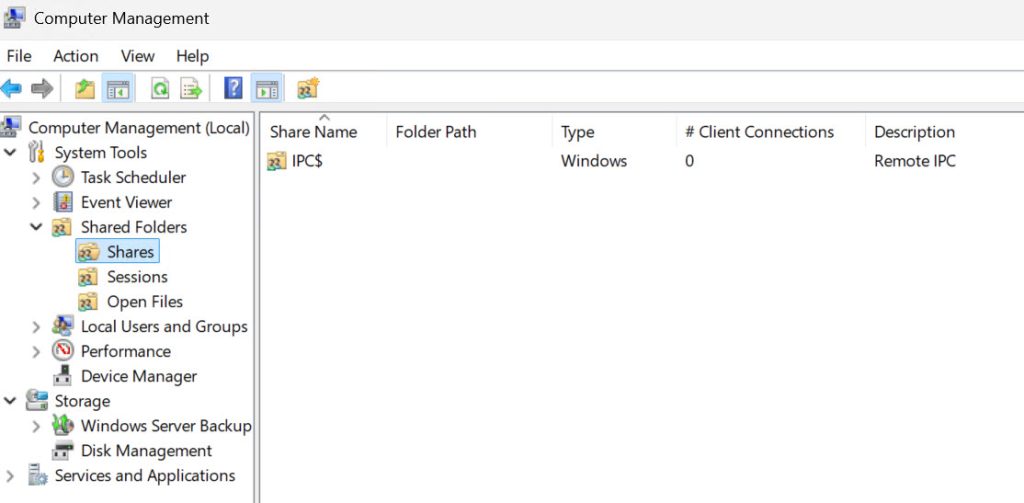
IPC$ will remain even after this action. It manages named pipes that are essential for communication between programs, remote desktop, remote management…
File/Folder/Disk sharing tips:
- Never share entire disk drive
- Share folders, granulate permissions (list/read/write) on a need to do basis
- Group users that need access to a resource
- Encrypt data in file shares if there is sensitive content
- Disable SMB v1
- Enable Auditing for file access and manipulation
- Think about third party auditing solutions if file sharing is crucial on your servers
- File shares should not be exposed to the internet
- Don’t use deny part, it will complicate your life
LOCAL SECURITY POLICY / LOGGING:
If your servers are in domain environment, you will define this through GPO, but, since we are talking about standalone servers here also, we will do these through local security policy. This is a very important part that will introduce some restrictions and enhance the visibility of your server.
Start Local security policy by entering following in search – secpol.msc
Under Account Policies – expand Password Policy
Every setting when you click on it has an explanation tab, where you can read what it does. Use it, you may want to set some things differently.
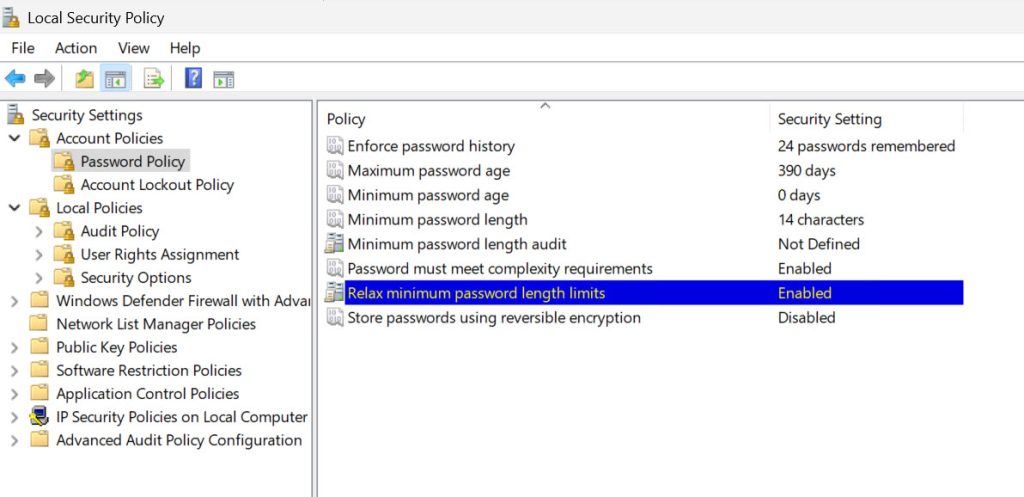
Next, go to Account Lockout Policy “folder”. Before you set this policy, make sure that you have created a new Administrator account, which we already done in the beginning. Otherwise, chances are you will be locked out fast after enabling this section if your server is internet exposed (via RDP…)
Here you will basically define how long your server will be locked after how many unsuccessful login attempts.

Under Local Policies – expand Audit Policy
I usually enable all policies, with Success and Failure options.
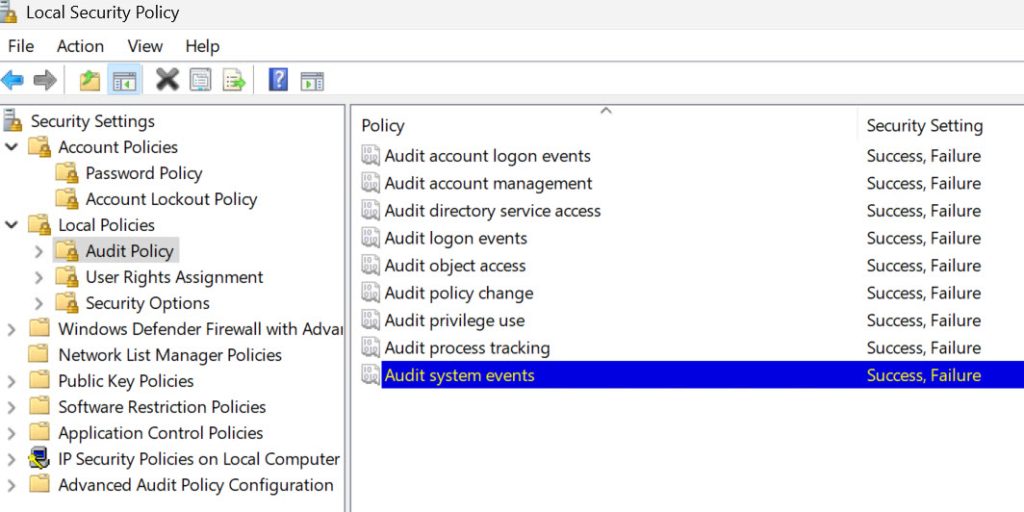
Next stop will be Security Options “folder”
Now, the first stop will be Interactive logon section.
Interactive logon: Display user information when the session is locked – Do not display user information
Interactive logon: Don’t display last signed-in – Enabled
Interactive logon: Don’t display username at sign-in Enabled
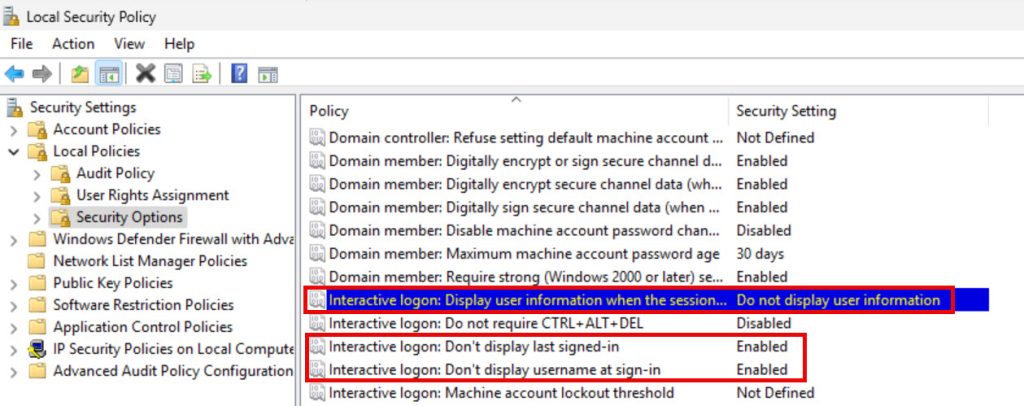
While we are at the Security Options – Interactive logon part.
Interactive logon: Machine inactivity limit, set some time limit after which machine will be locked. This is not as safe as logout, but it is better than active unlocked session
To completely log out logged user after period of inactivity, script is needed, but it is topic for another time.

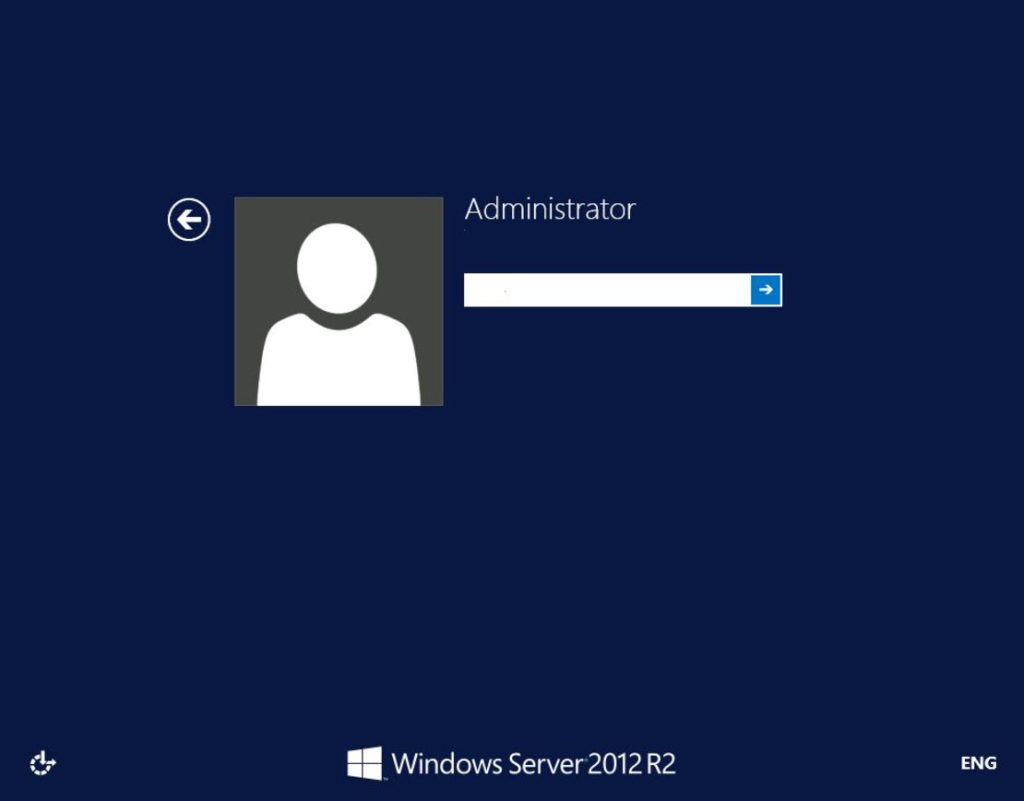
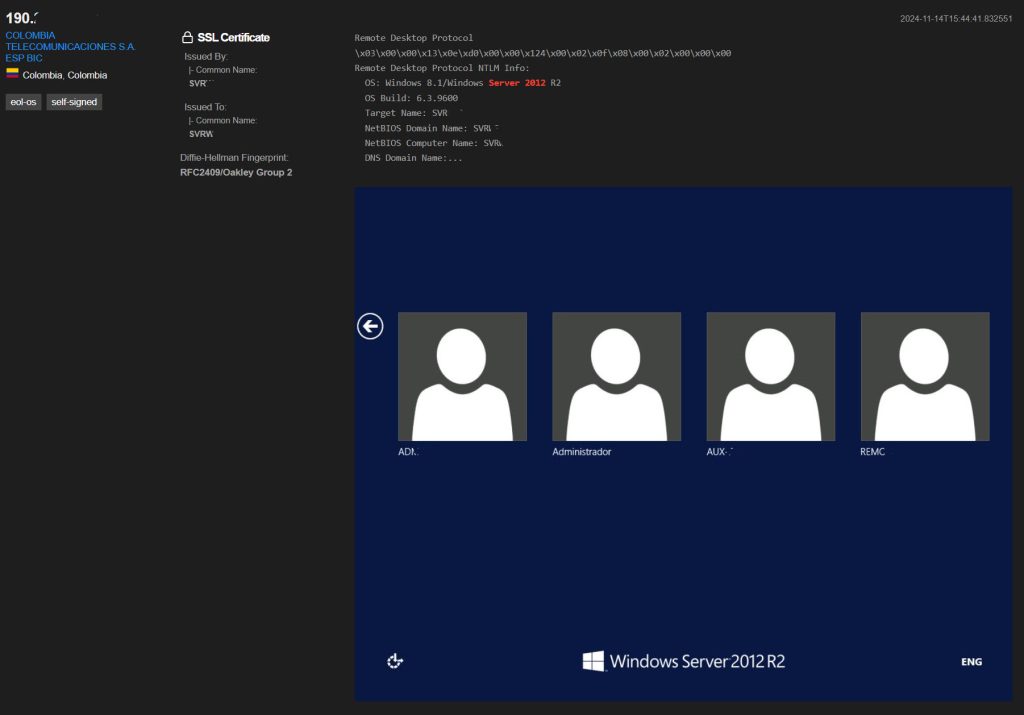
Interactive logon settings are especially important if your server is available via RDP online. This is how your login screen will look like. Potential attackers can scrape the data and brute force/guess passwords. But it will be harder if we remove those login data.
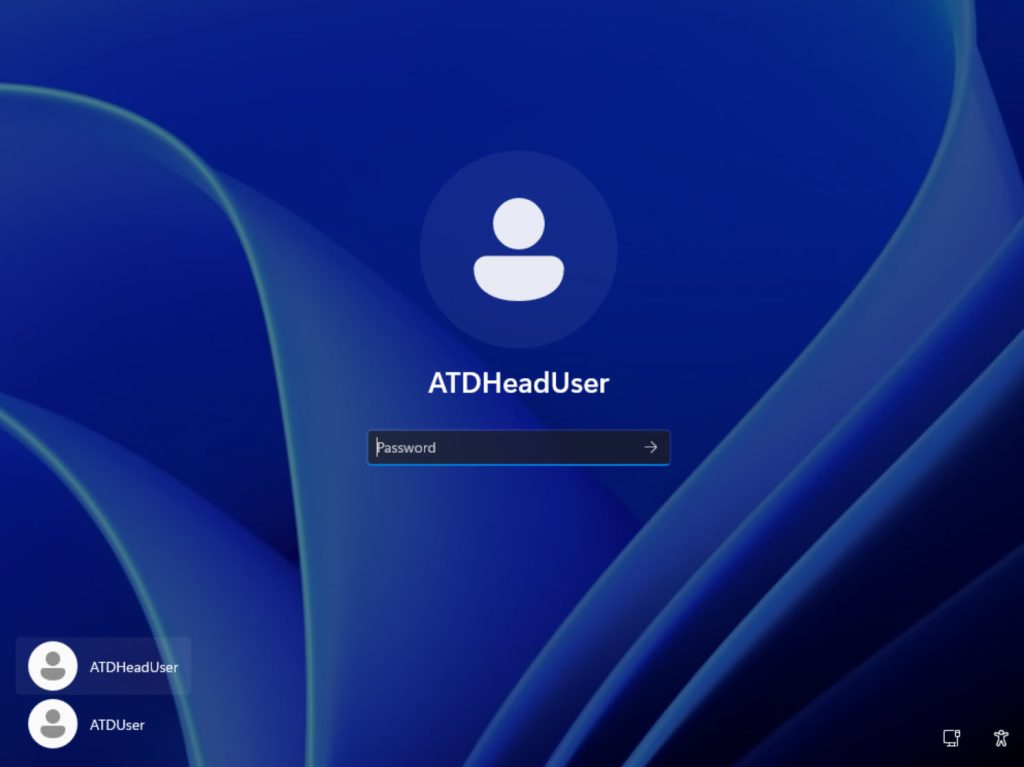
This is after we set those three interactive logon settings
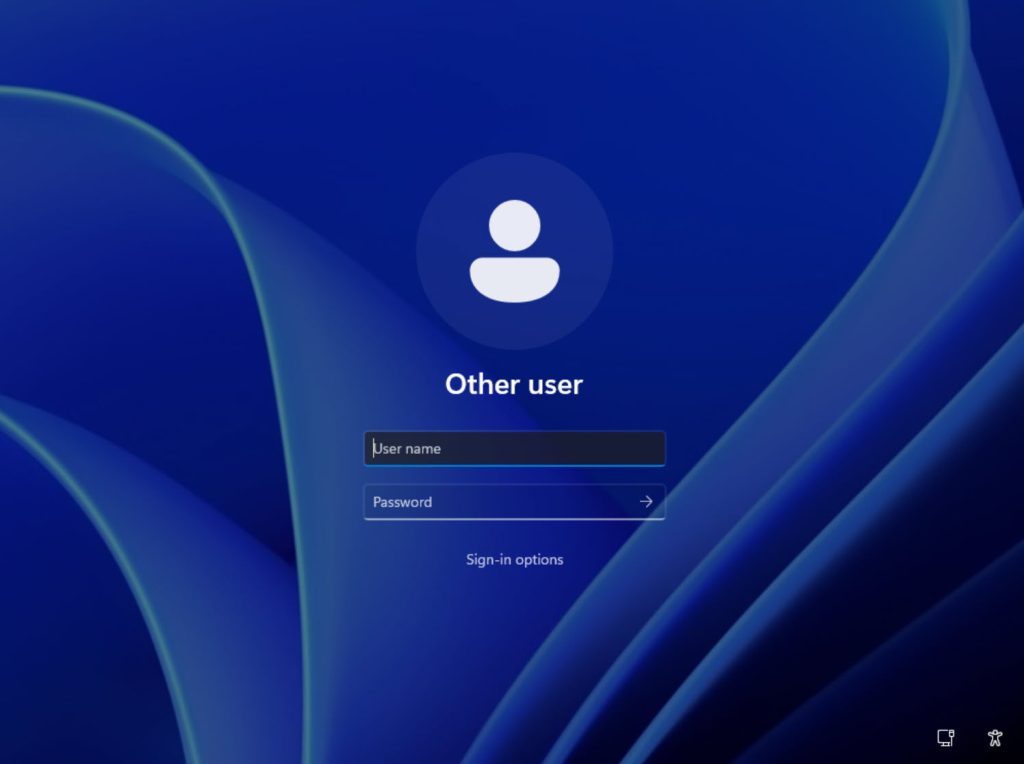
Next stop, Accounts section, under Security Options
Accounts: Administrator account status: Disabled
Accounts: Guest account status: Disabled
Account: Limit local account use of blank passwords to console logon only: Enabled

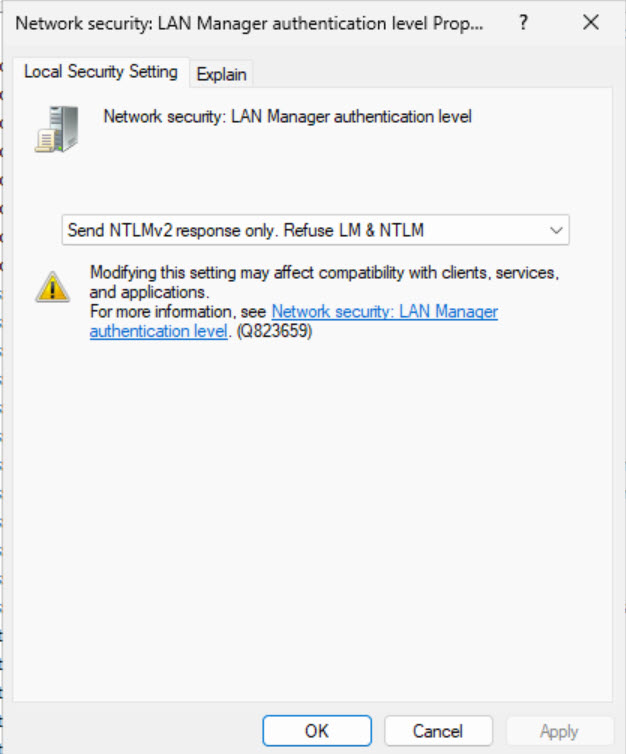
We will also do something under network security section
You should be VERY careful about this one, especially if you have old services and apps that still require NTLM or even worse LM to authenticate. If you are sure that you don’t have services that rely on these old protocols – under Network security: LAN Manager authentication level: Send NTLMv2 response only. Refuse LM & NTLM
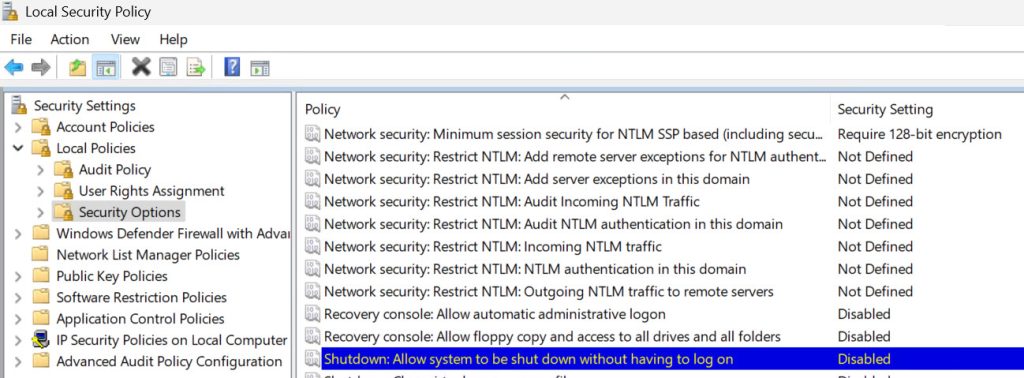
Shutdown: Allow system to be shut down without having to log on – Disabled
LOGGING
Logging
Logging is essential in case of problems. If you monitor logs regularly, you will be able to spot problems or breaches in time. Also, you’ll be able to reconstruct past events that led to problems.
Right click on start button – Select Event Viewer (or type eventvwr into search)
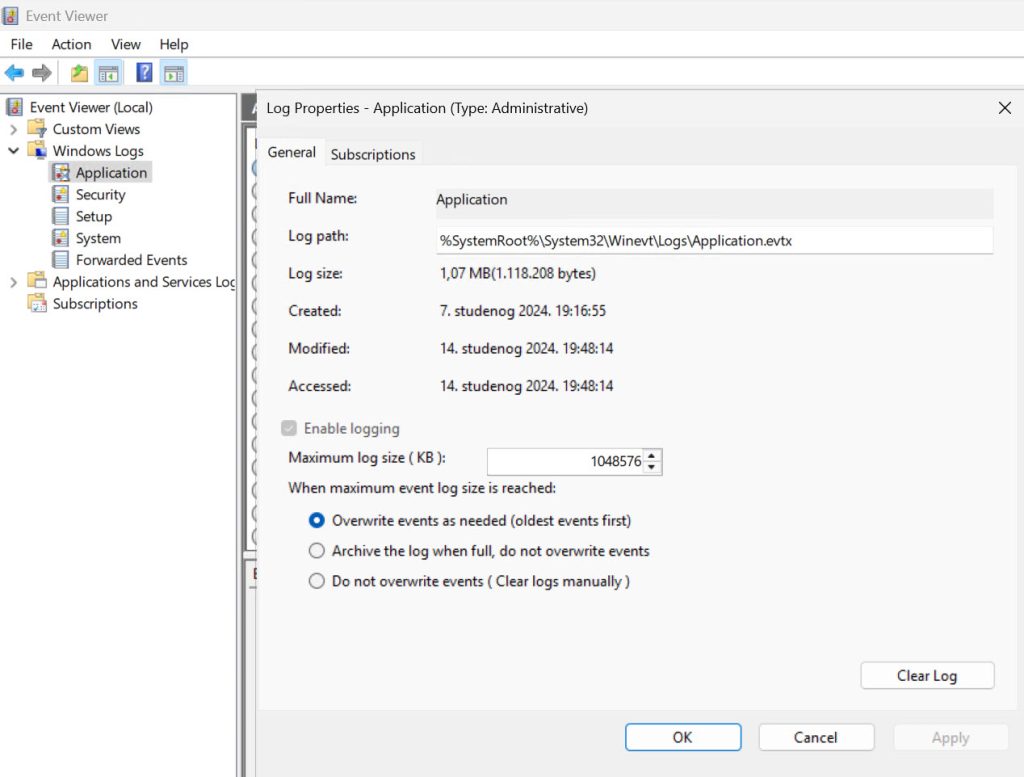
Expand Windows Logs, right click on Application and select Properties
Change maximum size to something larger – depicted below is 1GB for Application log. Repeat the same for Security, System, and everything that you find you need.
Logging tips:
- Ensure time synchronization
- Create custom views so you can monitor what is important to you
- Configure alerts for critical events (with Task Scheduler via email)
- Regularly review critical events
- Archive old logs!!!
- Centralize logging if possible
Bonus tip – Critical Event IDs
These event ID may help you spot suspicious activity on your server/network (this is not ultimate list, only few examples)
4625 – Failed user login
4688 – New process creation (useful for tracking suspicious processes)
4771 – Failed Kerberos authentication (often due to password or domain settings)
5136 – Change in Active Directory
RDP monitoring:
In case you want to monitor RDP connections, check Applications and Services Logs – Microsoft –Windows – TerminalServices-LocalSessionManager – Admin and Operational – look for events 21 and 22 to check how logged in.
Also check TerminalServices-RemoteConnectionManager
REMOTE ACCESS:
RDP
According to Shodan, there is 4.203.847 (about two million are just on port 3389 and are not serving RDP) servers and PCs exposed on the internet directly via RDP – port 3389.
Exposing RDP directly on the internet is a bad practice, you should always have proper VPN in front of your network.
However, when you have VPS, many of these VPS machines are directly exposed via RDP, we will now go quickly through best practice of configuring RDP.
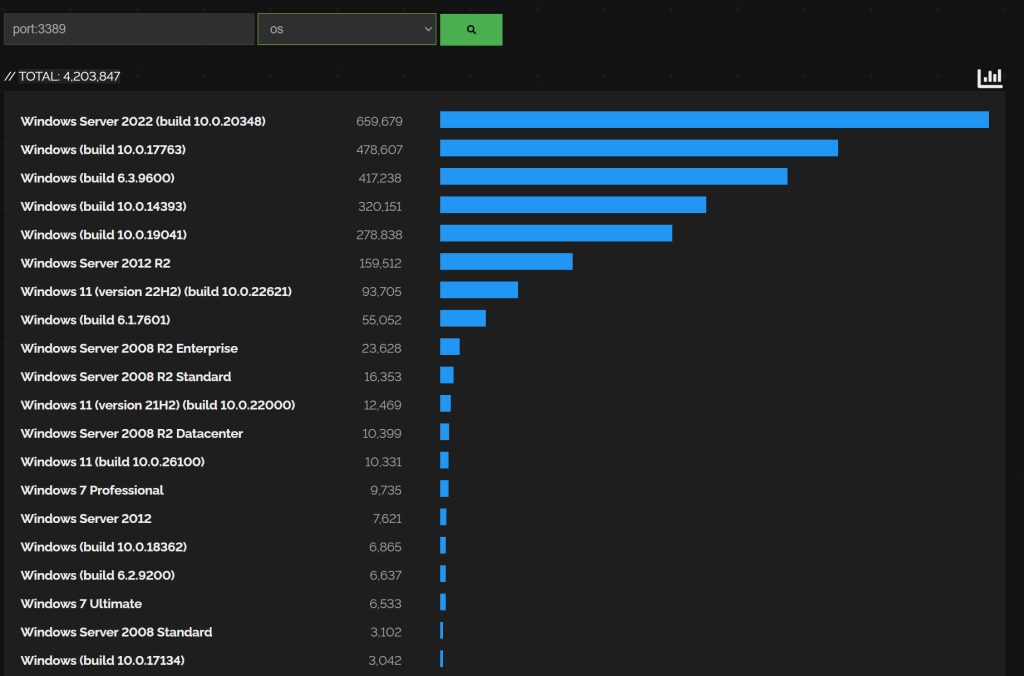
My first advice will be – try and get proper VPN in front of RDP. If you cannot do that, and must use RDP, follow along
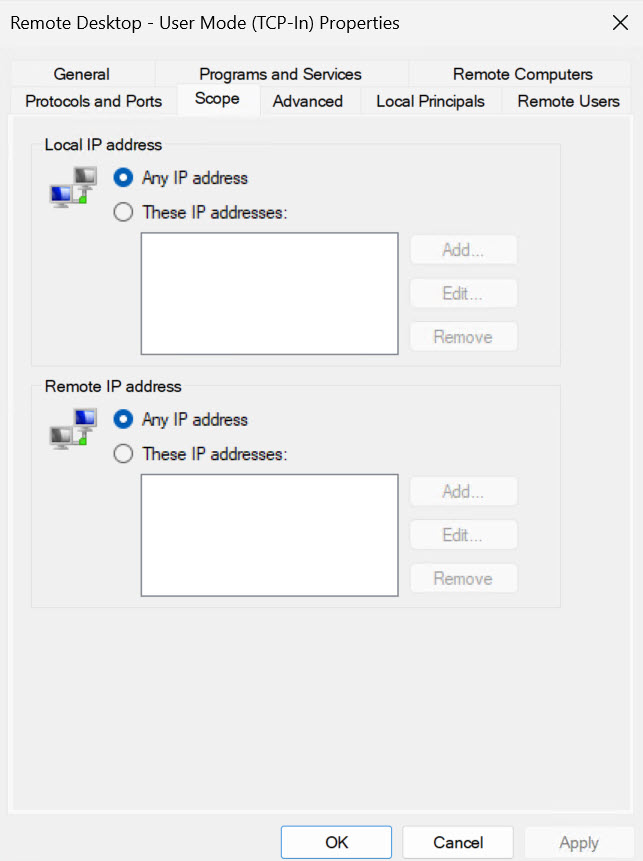
HUGE WARNING – you will need to have fixed local or WAN IP on your workstation for this to always work (or define range in which you know you’ll get IP). In Windows Firewall find Inbound Rule named Remote Desktop – User Mode (TCP-In), you can also edit (UDP-in) rule – On Scope tab, define Remote IP addresses or Local IP addresses from which you wish to allow connection to RDP
Change default port from 3389 (first add new rule to Windows Firewall – Inbound Rules!!!)
Navigate to regedit
HKEY_LOCAL_MACHINE\System\CurrentControlSet\Control\Terminal Server\WinStations\RDP-Tcp
Find Port Number – right click – Modify – select Decimal and enter new port number
(I selected 6689)
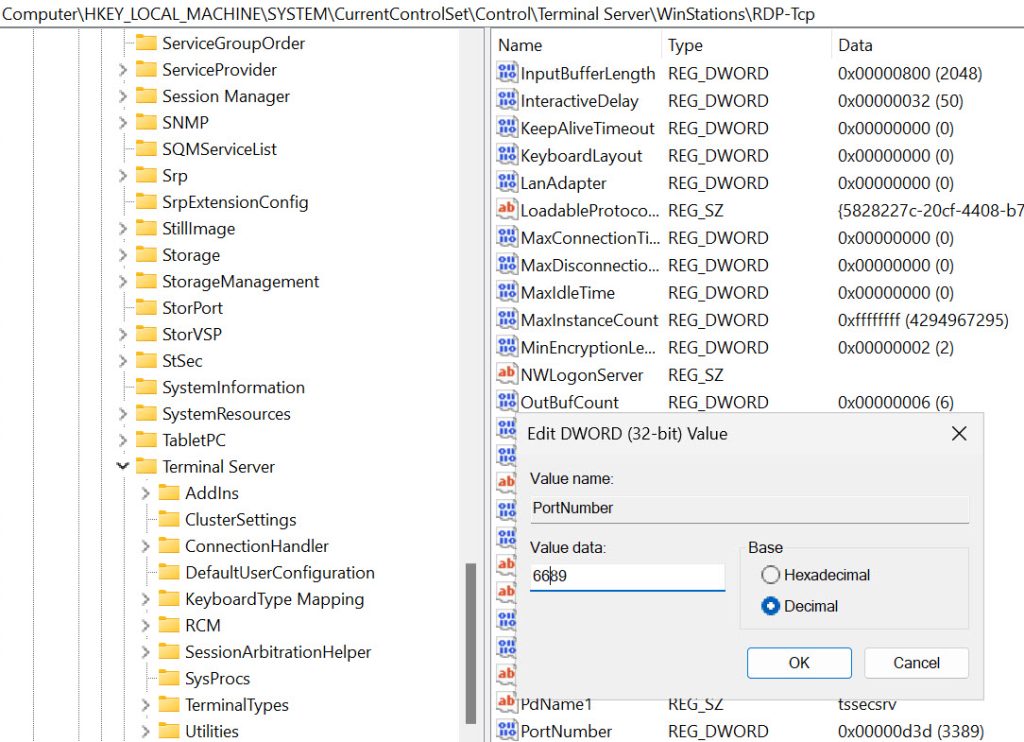
Before you reboot and retry connection create new Inbound Firewall rule with RDP port you set (I created 6689 TCP and UDP)

And I disabled predefined Remote Desktop ports on 3389

After server reboot you will need to specify IP address and port when you connect to RDP. So, in my case I will now connect to 192.168.10.200:6689
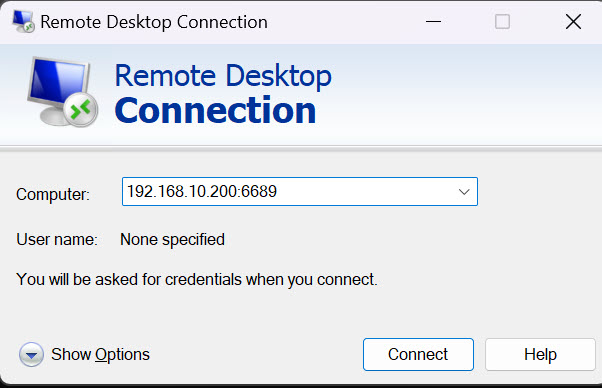
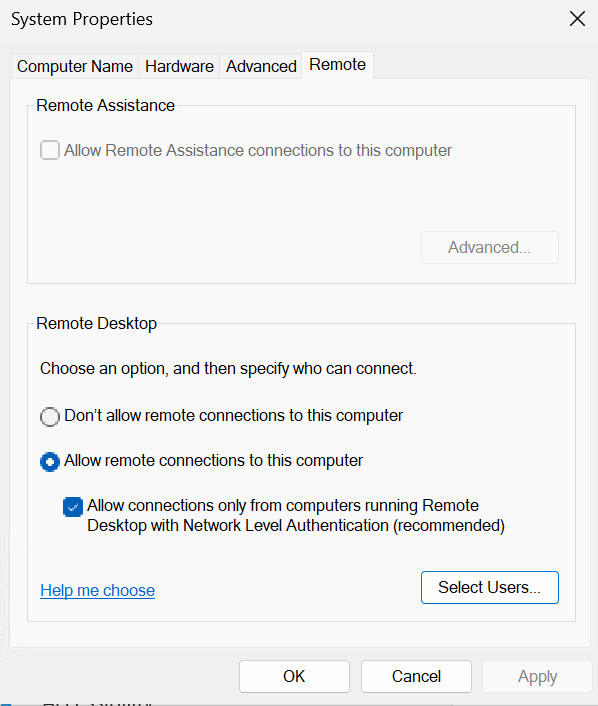
Enable Network Level Authentication – Allow connections only from computers running Remote Desktop with NLA…
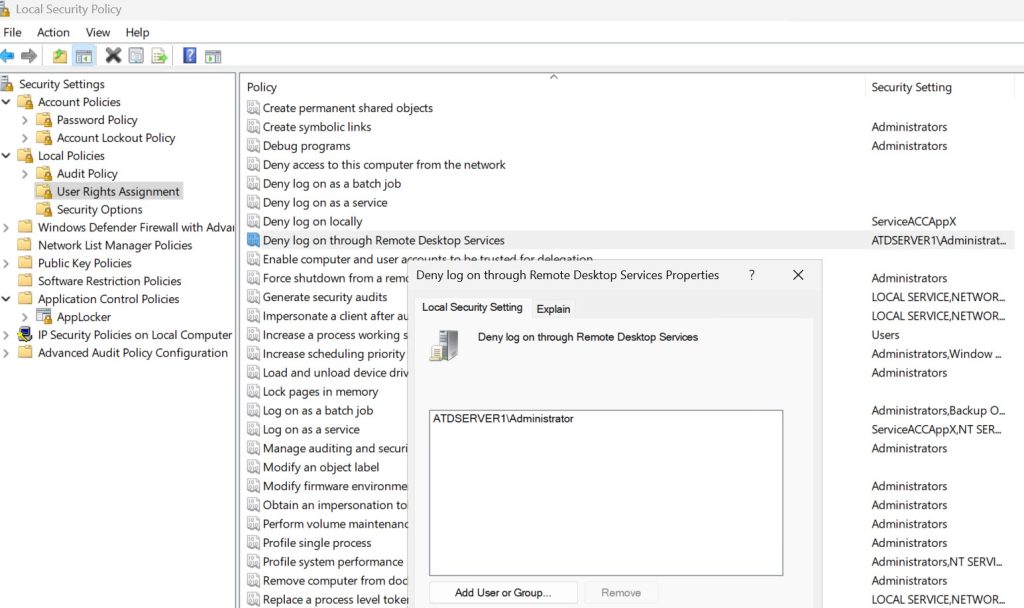
If for some reason, you cannot disable built in administrative account (Administrator), at least ban it from logging via RDP.
Local Security Policy – Local Policies – User Rights Assignment – Deny log on through Remote Desktop Services
Set timeout on inactive or broken sessions
Navigate to Group Policy – gpedit.msc – Computer Configuration – Administrative Templates -Windows Components – Remote Desktop Services – Remote Desktop Session Host – Session Time Limits
Enable both Set time limit for active but idle Remote Desktop Services sessions and Set time limit for disconnected sessions and set time you think fits your needs.
Don’t close Group Policy yet!

While we are still in Group Policy – Navigate to Group Policy – gpedit.msc – Computer Configuration – Administrative Templates -Windows Components – Remote Desktop Services – Remote Desktop Session Host – Security
Find Set client connection encryption level – Enable it and set to Client Compatible or better yet High (test for compatibility, but it should work)

Run cmd as admin and enter gpudate /force or reboot server for changes to apply.
Previously under Local Security Policy section we already set
Interactive logon: Display user information when the session is locked – Do not display user information
Interactive logon: Don’t display last signed-in – Enabled
Interactive logon: Don’t display username at sign-in Enabled
So, we don’t expose our username on login screen, which is a common thing if you look around internet
RDP tips:
- Use very strong passwords for RDP, implement MFA if possible
- Limit number of users with RDP access
- Use VPN, don’t expose RDP directly to internet
- If exposed, patch system on time, every month
- Don’t use Remote Desktop third party software if you don’t have to!!
VPN
Secure VPN should be the main way to connect to your system.
VPN should be provided by a dedicated appliance, to access your machine. I wouldn’t recommend using Windows Server as a VPN solution, publicly exposed.
VPN tips:
- Use IPSec, HTTPS tunnels, OpenVPN, Wireguard…
- Use strong encryption (AES-256 GCM)
- Use MFA!
- Enable logging
- Give minimal access to internal resources user/group based
- Update and maintain properly all VPN components
- Don’t use Remote Desktop third party software if you don’t have to!!
ROLES & APPLICATION RECOMMENDATIONS:
ROLES
The golden rule should be – install minimal services, only what you need. Each server instance should have only one role/purpose.
Also, don’t treat server as client machine – server is not a place on which you should browse web, code, watch movies…
If possible – use server core installation for your roles!
Don’t install multiple roles on one server (do so, only if the roles are related and similar in function)
When install roles, install only what you need, DON’T JUST SELECT ALL THE FEATURES THAT ROLE OFFERS – learn what you need at minimum for an app or service to function.
Learn to configure roles that you need in safe way – HTTPS for IIS, no FTP or WEBDav, Folder permissions for File Server (no SMB 1.0), Secure config for DNS…
Open separate service/user accounts for roles, apps, every service needs to have its own account.
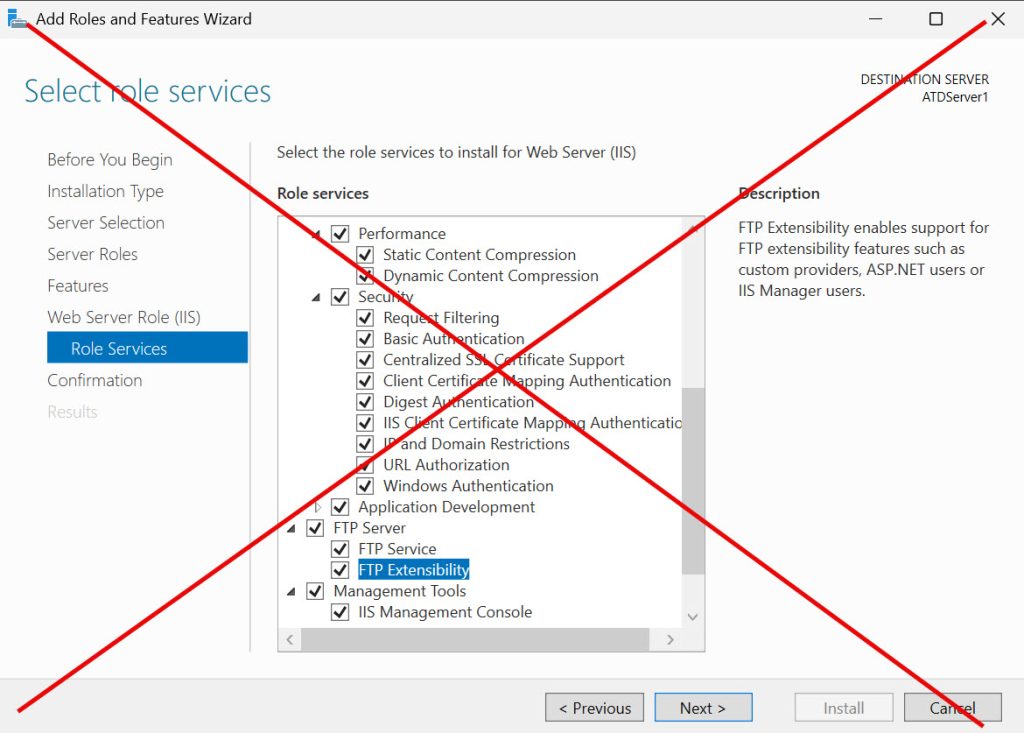
You should only select things that you need in a role, inform yourself on what is minimally needed for your app to work.
APPLICATIONS
Applications like web browsers, Office, Notepad++, VLC – don’t have place on the production server that is serving app or service. And that is it. Use server as a server.
Server is also not a place to browse internet, work, code… Add another client VM, or server, test and work there, and transfer results to the server.
If you need to have 3rd party apps installed on the server – make it necessary minimum, and make sure all the apps installed are up to date – update everything regularly.

SERVICES:
There are few services that you can safely disable (or not if you plan to use them.)
In search type services.msc
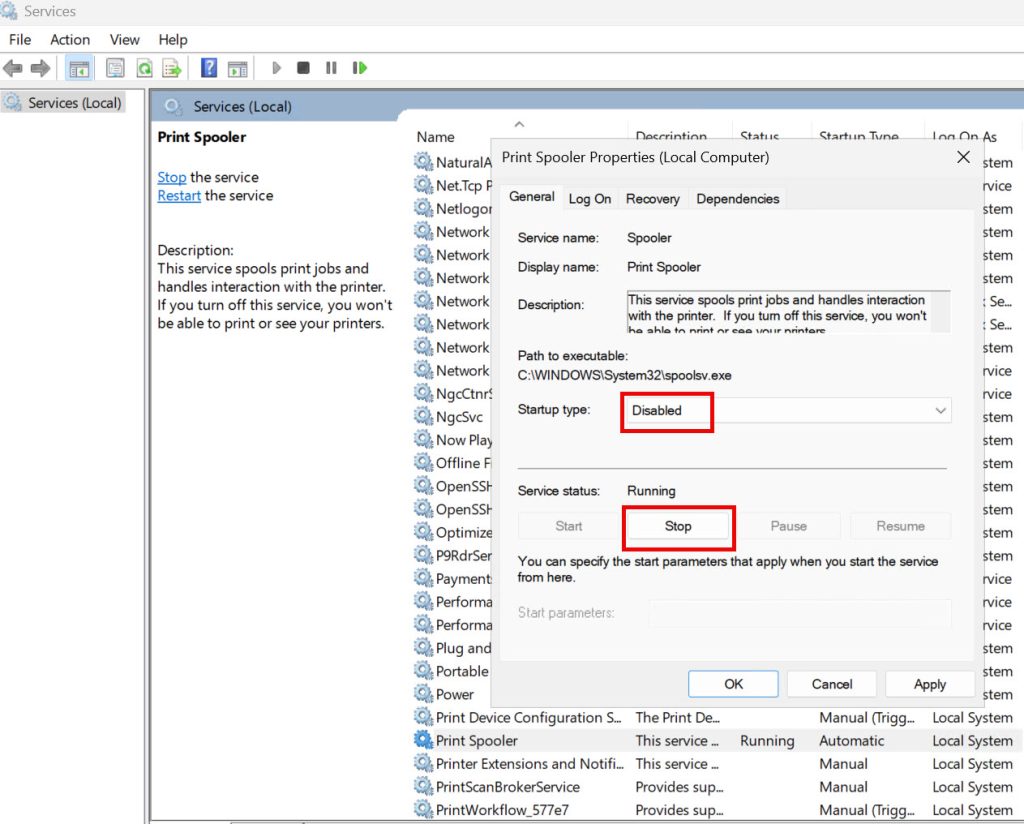
Print Spooler is the first service you can Disable (except if that server is print server). Through the years print spooler was source of serious issues, on most server it is not needed, however, it is still, even in Server 2025 running by default.

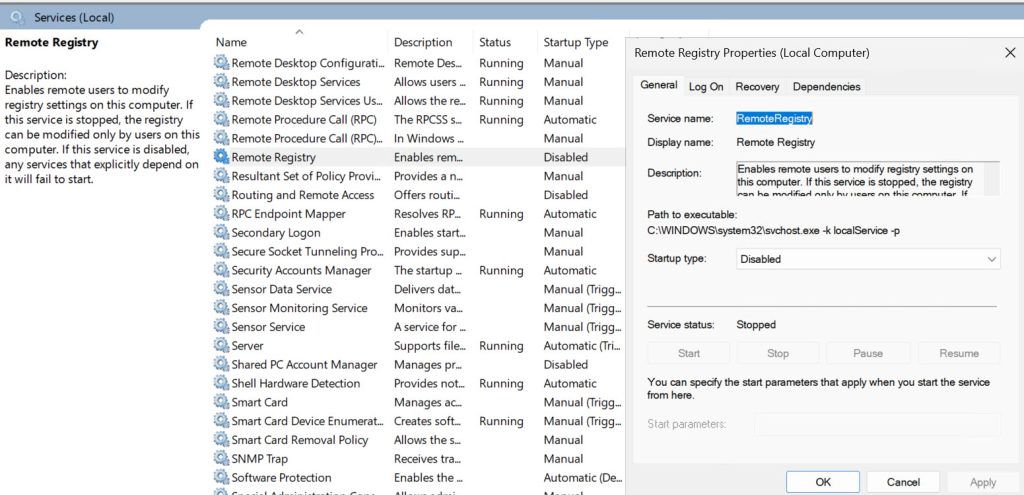
Remote Registry is second service that we can stop and disable
Services tips:
- Use service accounts
- Use Service SID if possible
- Disable what you don’t need
- Use Windows Defender Exploit Guard
- Enable logging
SECURITY:
Through this guide we already establish a few measures, but in the end we need good “antivirus“ system as additional layer of security.
Settings – Privacy & Security – under Security click on Windows Security
Before you proceed, check if there are exceptions needed for the app or service you are offering on your server installation.
Go through every setting under Virus & Threat Protection, App & Browser Control, Device Security. In the end all must be green. Test first, if you have specific app or DB.
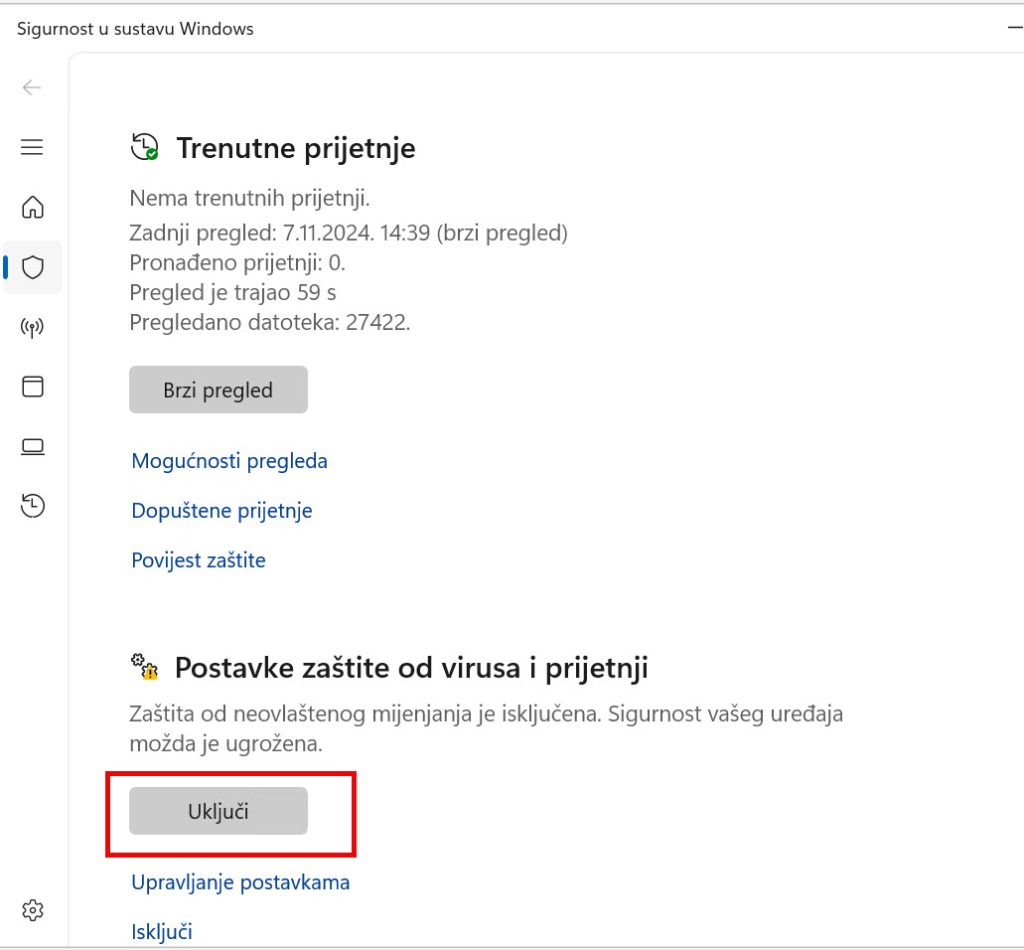
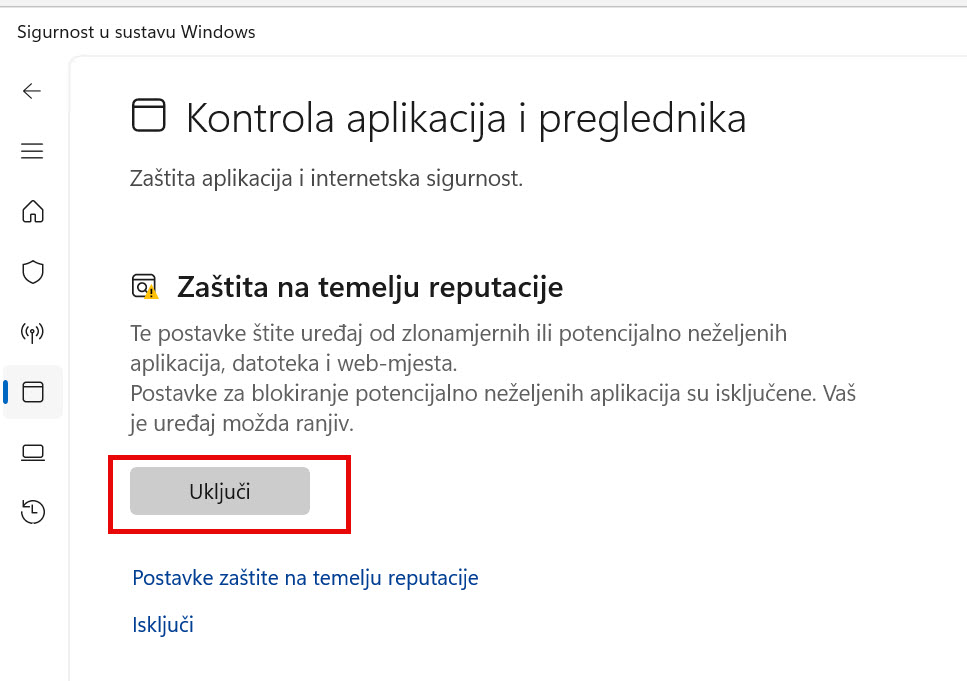
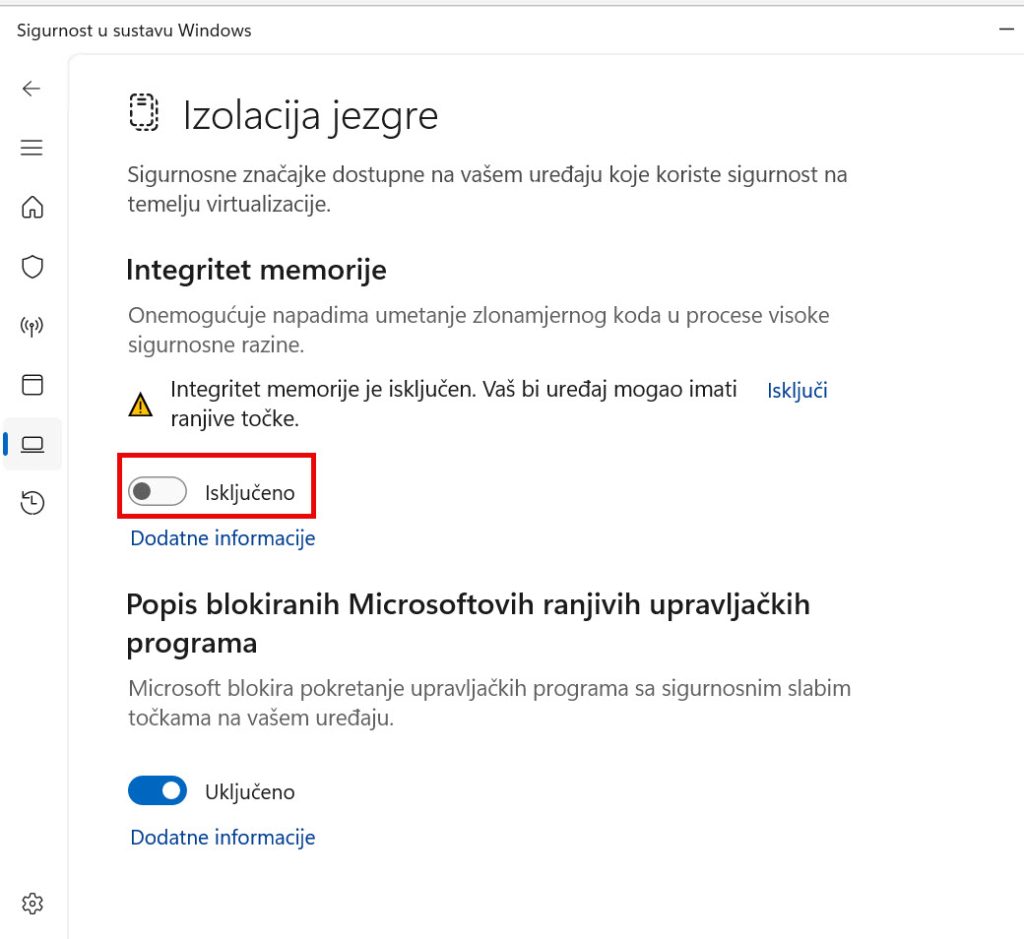
This has to be final result, everything needs to be in a green!
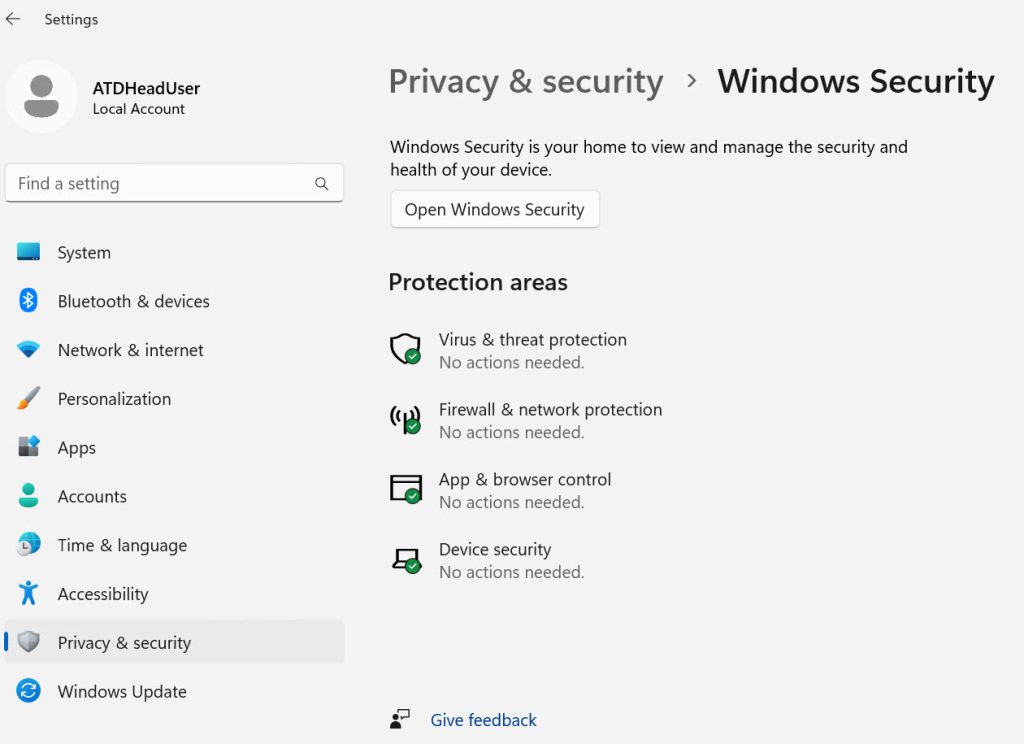
Windows Defender became a solid solution over the years, and is good enough, however, in free edition you will miss clear visibility. EDR solutions are popular, so if you don’t want Windows Defender, and have budget for something else, look for 3rd party solutions in that case.
Security tips
- Ensure hourly/daily updates work properly
- Configure real time protection
- Activate ransomware protection if available
- Configure scanning policy (full, quick scan)
- Exclude DBs or performance critical files from scanning (if defined and secured by manufacturer)
- Configure central management for component updates and control
- Set notifications and alarms for critical events (email, SIEM…)
- Actively monitor AV solution
- AV/EDR is not only solution, combine with firewall, IPS, IDS…
- Create reaction plan in case of breach
BACKUP/DISASTER RECOVERY
I left it for the end, but it is a critical part of the whole process. Backup may be your last resort at some point, so it needs to be good, and reliable. Snapshots or RAID fields on servers are not backups.
Windows Backup is ok, if you have a small number of servers. It is not installed by default, so if you want that feature, you will have to install it, it is under features.
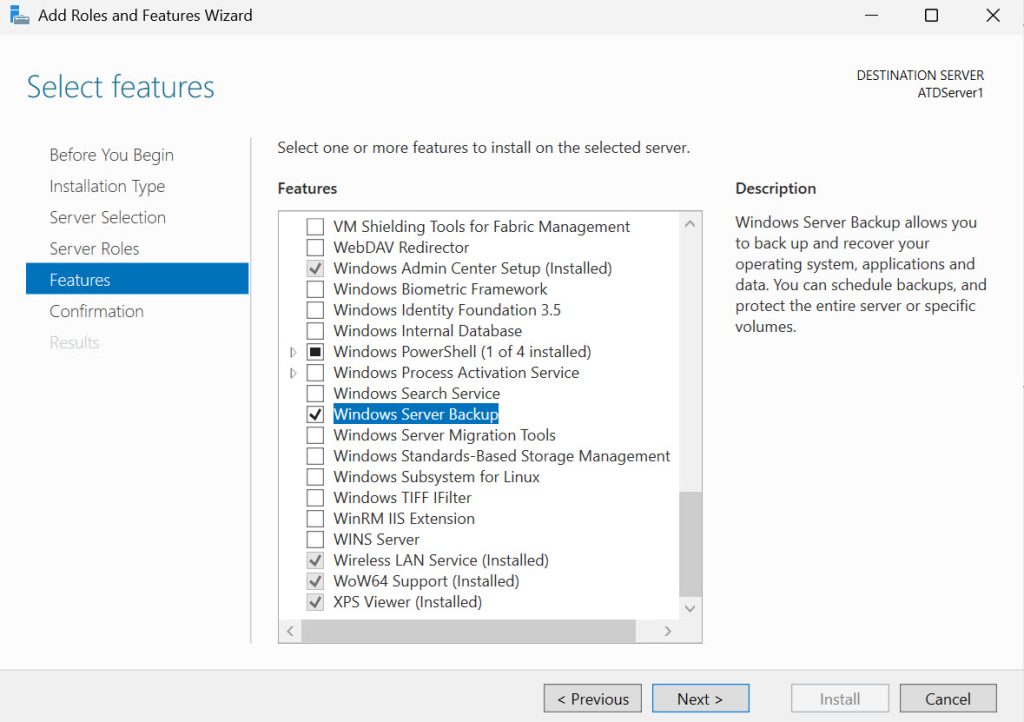
Here are some backup tips
Follow the 3-2-1 Backup Rule
3 copies of data: The original data and two backup copies (local, offsite/offline).
2 different storage media: Store backups on two different media types (e.g., local disk and cloud).
1 offsite copy: Keep at least one copy in an offsite location to protect against physical threats like fires or floods.
1 air gapped/immutable copy: backup completely isolated from the network, offline backup.
Use encryption for backups – Especially for offsite, cloud backups.
Set immutable/isolated backups – This cannot be stressed enough; you need isolated copies in case your system and backups are compromised. This will also be ransomware protection.
Automate/Schedule backups – Backups need to be in line with business needs, set critical data as hourly/daily backups, and not critical dana can be backed every week/month. This is completely subjective, and you need to set them according to your needs.
TEST BACKUP RESTORATION – Backup is invalid without testing, make sure you test your backups regulary, so that you know they are valid.
Use dedicated backup accounts -Open user accounts specially for backup and restore processes.
Audit and monitor backup activities – You need to know when the backup stops
Document and update your backup strategy – You need to know if backup is running out of storage, if timing is right, and all the critical data I sufficiently covered. Make sure you know timing, locations of your backups.
Create a Disaster Recovery Plan – Develop a disaster recovery plan that outlines steps to quickly restore critical data and services in case of an attack, data loss, or physical damage to the server.
Periodically test the plan in simulated scenarios.
CONCLUSION
These are in short basic steps to make your Windows Server more secure. There are always more details and steps that can be done, but these are first steps in right direction.
Also, it is important to remember, there is no absolute security, we just did a bit of risk mitigation for some aspects of Windows Server.
In the end don’t forget – scan your systems regularly, from outside and inside, to find weak spots and mitigate them.