You want to give FreeNAS a try in you small business network, but you`re wondering is it possible to integrate it with your Microsoft Windows Active Directory? Answer is Yes. If you`re interested to see how, read on…
In this tutorial I`ll be using Microsoft Windows Server 2008 R2 ( any version will do ) with already created test domain ( I`ll be using screens from testing for my company). Name of domain controller is -> DC1. FreeNAS 8.0.1 will be used in this tutorial.
You can get trial Windows Server 2008 R2 copy here.
FreeNAS 8 can be downloaded here.
If you want it all virtualized – Virtualbox 4 can be downloaded here.
Since there are some issues with adding FreeNAS 8.0.1 to Windows Server 2008 AD, our first step will be to manually add FreeNAS 8.0.1 to Windows Server 2008 DNS Records. This step is needed in order to successfully finish adding FreeNAS 8.0.1 to Active Directory. First time, I tried without this step and it didn’t work as expected.
STEP 1
Adding FreeNAS 8.0.1 to Windows Server 2008 DNS Records.
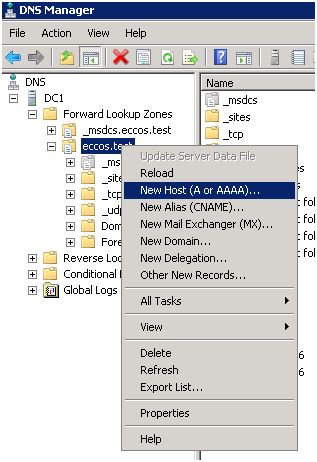
Start | Administrative Tools | Choose DNS | Choose your Domain Controller. In my case it`s DC1 | Choose Forward Lookup Zones | Choose your domain |Right click on your domain name | Choose New host ( A or AAAA )
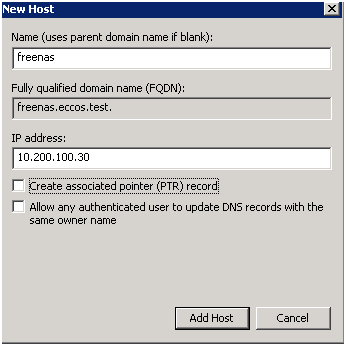
New window appears. Name: Enter name of your FreeNAS installation | IP address: IP address of your FreeNAS. | If you need any other settings on this screen – choose them | Choose Add Host
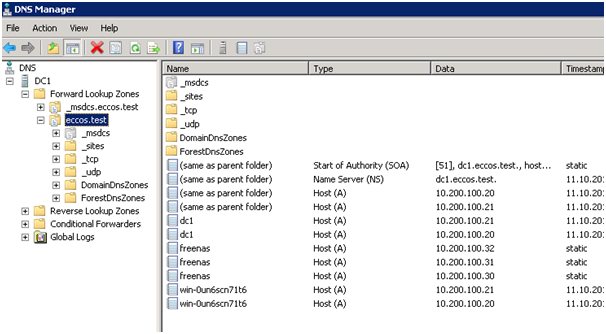
Notice: If you have more than one network adapter on your FreeNAS, repeat this step for every IP address of your FreeNAS.
Result
After adding FreeNAS to DNS Records, next step will be configuration of an AD service on FreeNAS.
STEP 2.
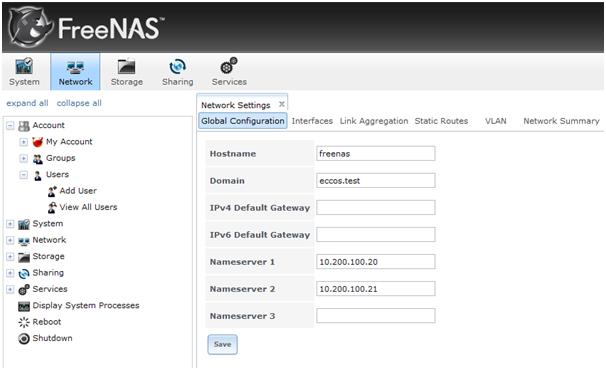
Before configuring AD service we need to add Windows Server 2008 DNS servers to FreeNAS.
Network | Network Settings | Global Configuration | Hostname: name of your FreeNAS installation | Domain: name of your domain | IPv4/v6 Default Gateway: leave empty if you don`t want to give FreeNAS option to connect to the internet | Nameserver 1/2/3: enter addresses of your DNS servers | Save
STEP 3.
Finally we will start configuring AD service on FreeNAS.
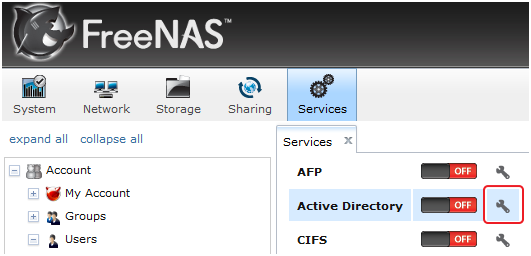
Services | Active Directory – don`t click on ON/OFF switch yet, first choose Settings next to switch.
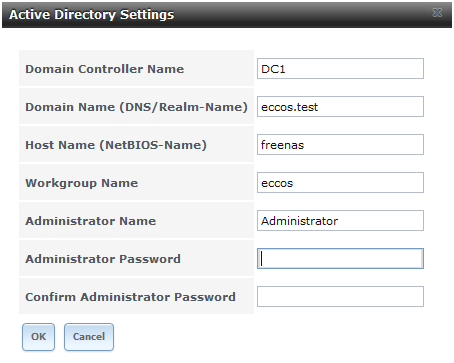
Domain Controller Name: name of your DC | Domain Name: domain.name | Host Name: name of your FreeNAS | Workgroup Name: according to user manual „name of Windows server`s workgroup (for older Microsoft clients) | Administrator Name: domain administrator account name | Administrator Password:enter domain password | OK
After entering all necesery info into AD configuration, reboot your FreeNAS. After rebooting switch your Active Directory service on FreeNAS to ON.
Services | Active Directory | ON
(If service won`t start at first attempt ( just stays in OFF position) try it few times)
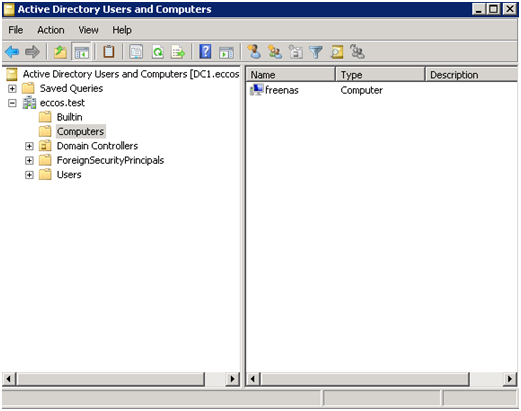
After activation of AD service check the Windows Server 2008 AD Users and Computers to see if FreeNAS appeared on computer list.
Start |Administrative Tools |Active Directory Users and Computers | Choose your domain | Computers
STEP 4.
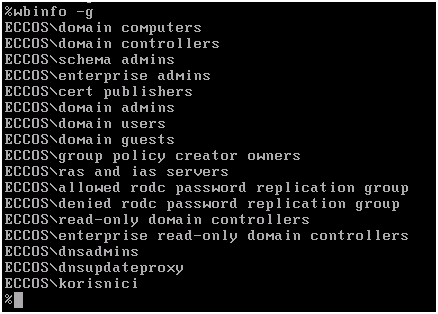
I want to check the transfer of AD users and groups from Windows Server 2008 to FreeNAS after joining FreeNAS to Windows Server 2008 domain. For testing purposes I created users “user” and “korisnik” and group “korisnici”.
I`ll check that in CLI of FreeNAS 8.0.1 with following commands.
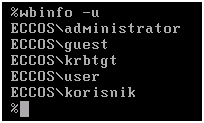
For user info: wbinfo –u
For group info: wbinfo -g
Users successfully imported from AD into FreeNAS.
Groups as well successfully imported.
And that was the final step. We successfully joined FreeNAS to Microsoft Windows Server 2008 domain.
You joined FreeNAS to your domain, but what now? Check my article where I describe creating CIFS share on FreeNAS in Microsoft Windows network environment.
If you want to know how to add Microsoft AD permissions to your CIFS shares please check my article here.
